

D-Tek Fuzion V2 CPU Waterblock Review
Introduction
Welcome to my pressure drop and thermal testing of the D-Tek Fuzion V2 CPU water block designed for a wide range of processors. This is an actual production run copy.
I would like to give special thanks to Gary from Sidewinder Computers for providing me with a sample to test. Sidewider Computers is one of my favorite places to shop for water cooling gear. They carry a wide range of products and typically the lowest prices. And what is even more important to me, they are very committed to advancements in this industry and are very active in the community. I highly recommend you giving Sidewinder computer systems a visit on your next build!
I would also like to thank Daniel from D-Tek for his previous assistance with my GFX review. That was a test I ran with another forum member's GFX block that unfortunately resulted in a pin breaking on the base (likely my own fault for cleaning too abruptly). I ended up buying that block from the forum member, and D-Tek sent me a brand new base, no questions asked. That means alot to me in showing D-Tek's high level of customer service, and I would highly recommend them for that reason alone. They are also very well know for the Fuzion series CPU and GPU blocks and have been designing waterblocks for a very long time. Their extensive experience is very apparent from the long term placement amongst the best performing blocks out there.

Block Characteristics
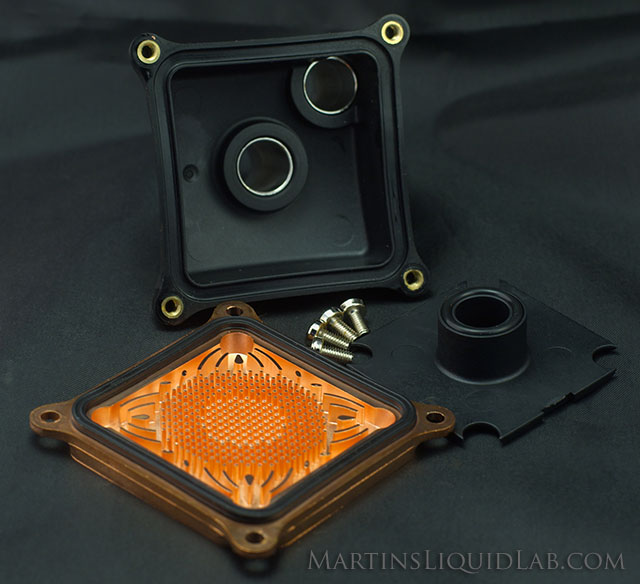
The block is a cast copper micro round pin base design that is very well known for it's extremely strong performance in the Fuzion V1. The top and midblock are cast delrin which is a very popular and durable material for water block production. The V2 also now has the middle block fitted within the top block (insert) without the need of an exterior gasket like V1. So the overall block has been simplified, you now have the copper base, gasket and top block, the middle block is now sort of snapped into place into the top block.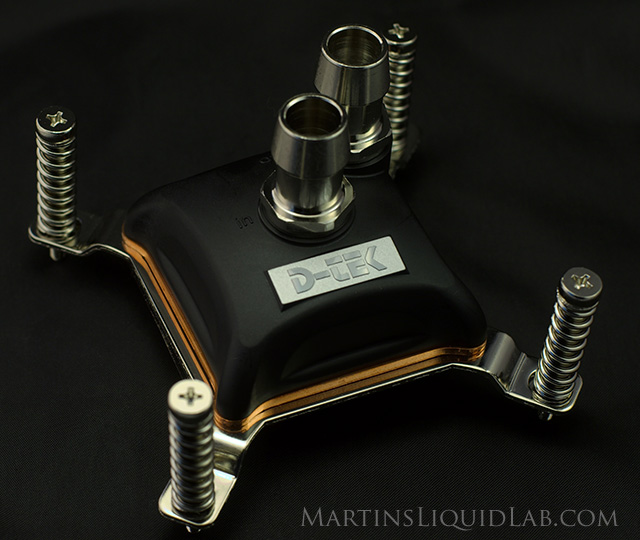
The new V2 takes on a more rounded top look with bottom fixed hold downs. Shown above is the pro-mount
The new V2 has made some appearance modifications. With the all internal configuration of the midblock, you now have what appears from the exterior as a single block on top of the copper base. D-Tek has also made the block lines less blocky and a bit more round. In addition as part of this change, the hold down plates are now all bottom mounted.
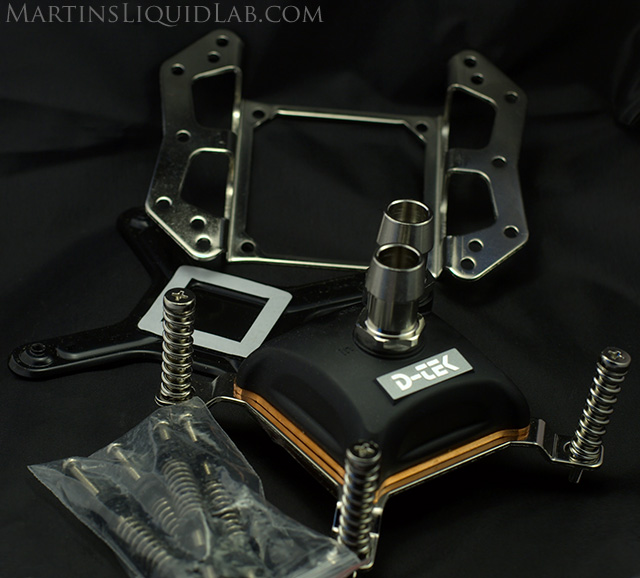
The parts included were the block with pro-mount preinstalled, the universal hold down, back-plate!, and studs/springs/washers/nuts.
In my testing I believe having the hold down plate bolted on, provides better consistency between mounts. I found the universal hold down of the V1 was more difficult to ensure a nice level mount. While I prefer the new pro-mount, I did not use it in my test because by design(using the preinstalled screws), it requires you to remove the motherboard every time and it's essential in testing that motherboard removal is not required for speed. The pro-mount comes with springs and screws to bolt through and thread into the back-plate that's provided. I really appreciate the new bottom affixed hold down designs, great improvement over V1.
The Base is nicely finished, straight edge shows it is very slightly bowed.
The base is nicely finished and using a straight edge with a strong backlight the base does very slightly bow when tightened down. My only issue with the bottom side is the flat head allen screws used. They are fairly loose on a 2mm allen wrench, nothing that can't be replaced, but be careful.
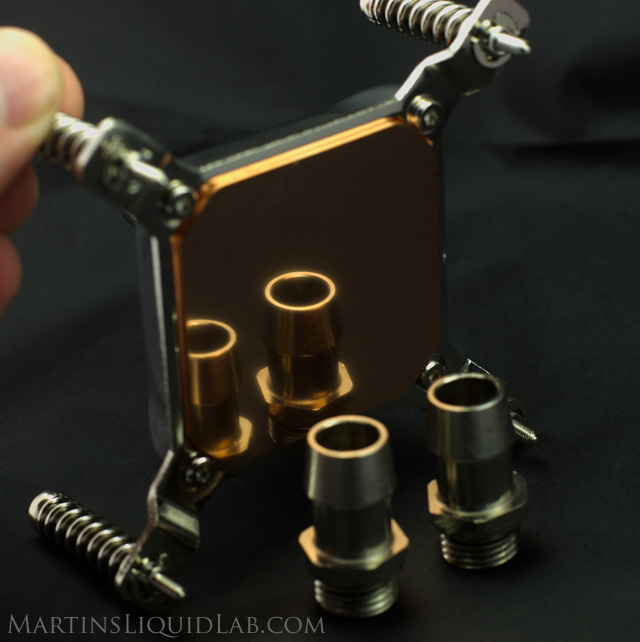
The interior reveals a similar midblock flow path as V1, but the mid-plate is now an insert into the top (O-Ring integrated!)
The interior reveals a similar midblock flow path as V1, but the mid-plate is now an insert into the top (O-Ring integrated!)
The new V2 adds an integrated o-ring into the midblock to prevent any internal leaks between the midblock and top block (this is an improvement over V1). In addition the perimeter gasket provided was clean and tidy (improvement over V1).
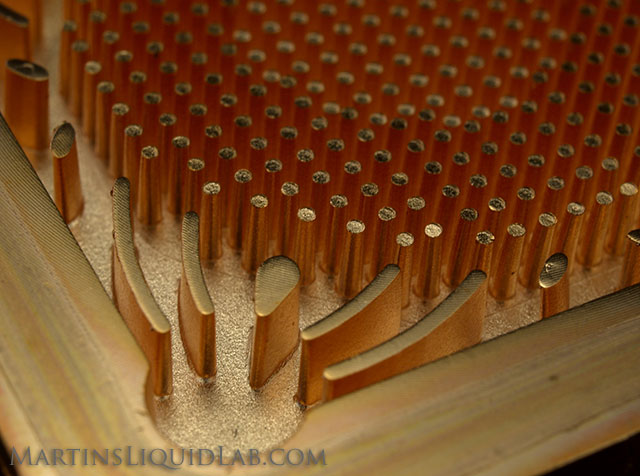
The base is cast round micro-pins with perimeter channels, similar but slightly different from V1. Quality is very good.
The base is cast round micro-pins with perimeter channels, similar but slightly different from V1. Quality is very good.
Upon initial inspection of the new V2 base I first noticed that they are now machine finishing the top of the block (note the faint machining marks in the above photo). This should provide a more level and true surface for the gasket to seat upon and removes any casting roughness at this critical sealing area. Visually I really couldn't see any other differences, but using calipers brought forth more than meets the eye. To break this down, I've created the next section that outlines the differences between the two blocks that I noticed.
D-Tek Fuzion V1 and V2 Differences
| Characteristic | D-Tek Fuzion V1 | D-Tek Fuzion V2 |
| Total Base + Pin Thickness | .220" | .200" (.020" Shorter) |
| Tall Perimeter Pin Height | .160" | .150" (.010" Shorter) |
| Base Thickness below Pins | .060" | .050" (.010" Thinner) |
| Stock Hold Down Plate | Loose | Fixed to Base includes pro-mount |
| # of Perimeter Block Gaskets | 2 | 1 (mid block is now an insert) |
| Midblock to Top Block Nozzle Gasket/Oring | None Stock (Purchased with Nozzle Kit) | O-ring included stock |
| # Nozzles possible (Variable Restriction) | 7 total, one quad Stock, Stock + Gasket, 6.3,5,5,4.5, 3.5, quad |
7 total, two quad Stock, 6.3,5,5,4.5, 3.5, quad, + quad Midplate |
| Copper Base Gasket Contact Surface | Cast | Machined after casting |
So in addition to the cosmetic changes, there have been a rather significant number of other physical changes, some of which are just simplifying the design, but many of which are performance optimizations.
Hydraulics and Pressure Drop Testing
The most scientific way to determine a blocks hydraulic resistance is to test pressure drop. Pressure drop is a measurement of pressure loss across a block that varies with flow rate. This is basically a measurement of energy loss, and directly influences how much flow rate you will have.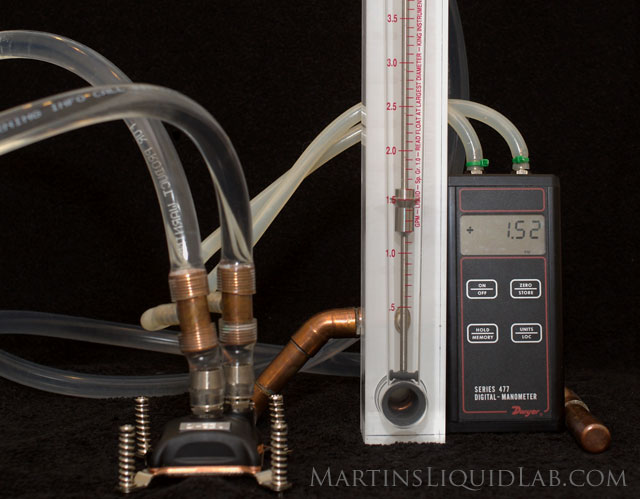
Equipment:
- Dwyer Digital Manometer 477 Mark IV - Accuracy .5% of Full Scale. Range 0-20.00 PSI range, Resolution .01 PSI
- King Instruments 7520 Series 0-5GPM, 250mm scale - Accuracy 2% of Full Scale. Range 0-5GPM, Resolution .1 GPM (can be interpolated to .02GPM)
- Water Source - Household water pressure - 50PSI at >5GPM - Because flow rate readings are instantaneous, household tap water and water pressure are a good and powerful source for pressure drop testing.
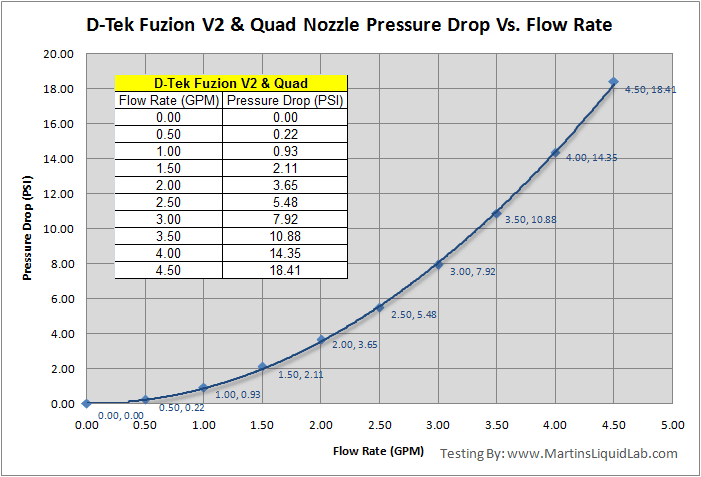
The quad nozzle is the least restrictive nozzle of the bunch. This is intended for quad core users (I will try this soon on a quad processor upgrade).
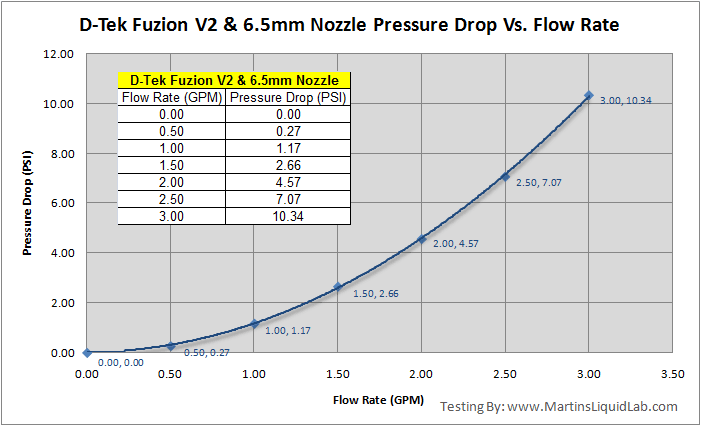

Just slightly lower restriction than the EK Supreme or Aqua Computers double impact.
I tested this nozzle thermally for my E6600, results below.
Now for some comparisons, first up...how does V2 compare to V1 you might ask:
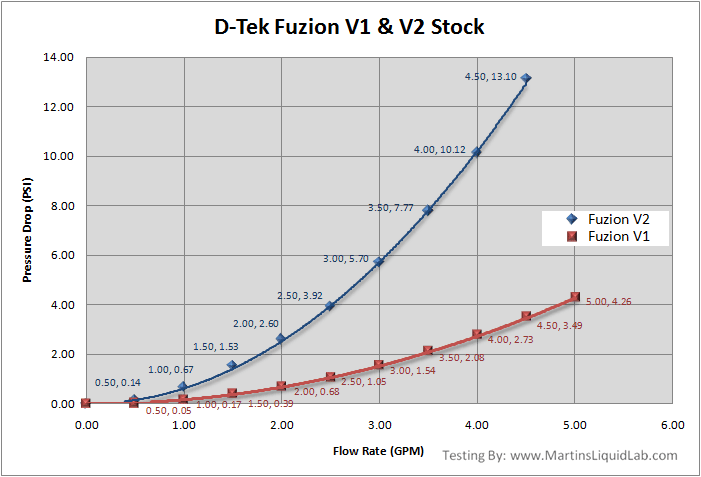
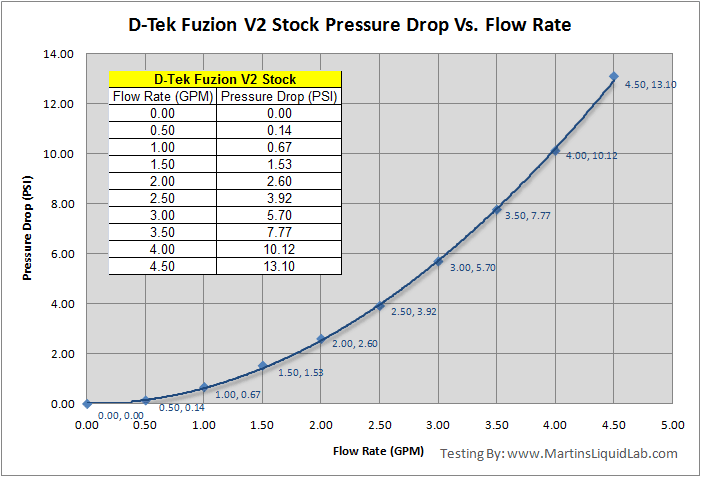
LOWER IS BETTER, V2 is about 3.7X more restrictive than V1.The new V2 with the shorter pins and sealed mid/top block is approximately 3.7X more restrictive than V1. It's still not high restriction, but it definitely is more of an average restriction compared to the low restriction of V1 without washer. The D-Tek Fuzion V2 stock is now very similar in restriction to the Apogee series blocks.
I also had some folks ask me to post all of the V1 and V2 nozzles in one chart. The following is a chart of that based on the equations I extracted from excel representing the data trendlines:
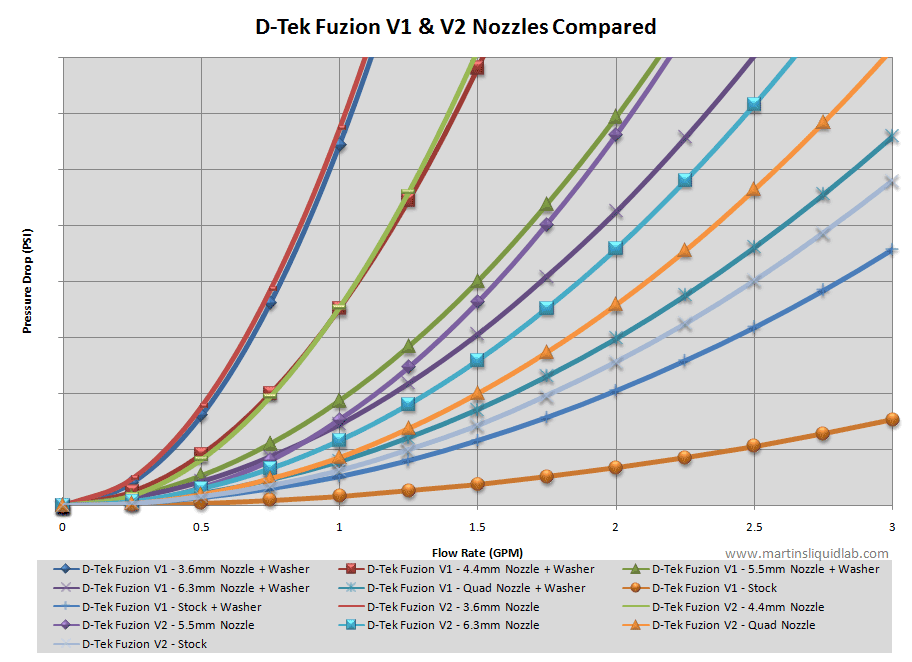
So overall the smaller nozzles are roughly the same restriction in either block as the nozzle becomes the significant restriction dominating the result. Some of the results however are swapped around like the 6.3mm nozzle, I suspect it may be the nozzle in the V2 result was not sitting entirely flush. One thing I noticed in testing the nozzles in the V2, the nozzles were not quite as snug as the V1 midblock so it was more difficult to make the nozzle sit down properly.
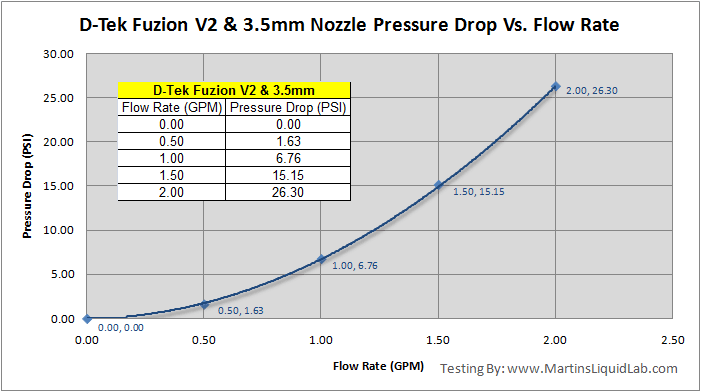
Adding nozzles does increase restriction quickly. For example somewhere between the 4.5mm and 5.5mm nozzle is roughly equal in restriction to the high restriction blocks like the EK Supreme, Aqua Computers double impact, etc. Here is a look at all of the nozzles tested along with the Aqua Computers double impact and XSPC Edge Acrylic for reference.
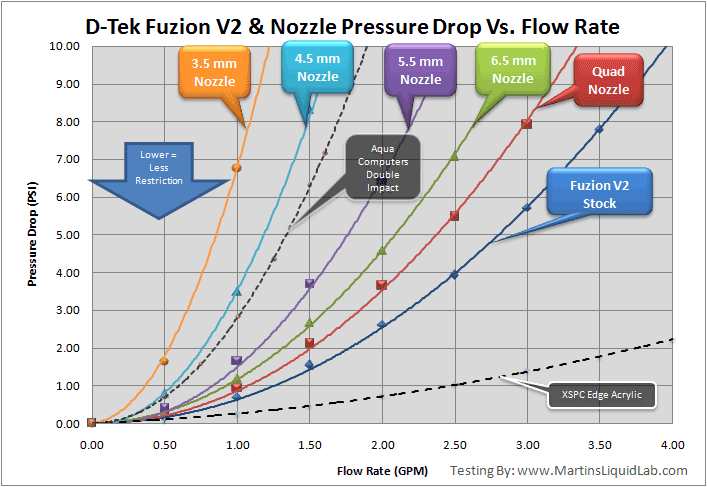
The V2 allows you to have an average to extreme restriction setup depending on the nozzle selected.
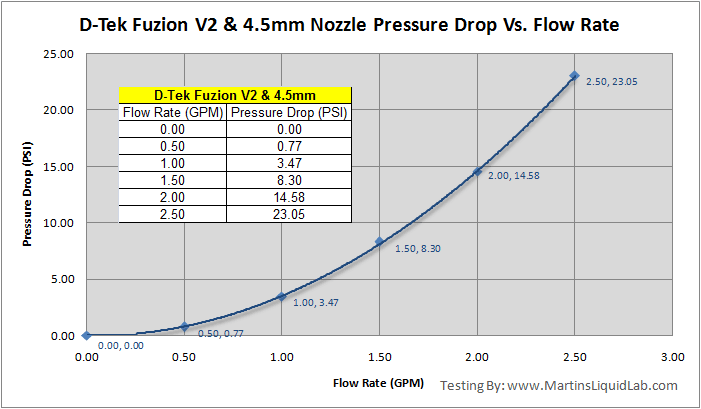
The 4.5 and 3.5mm nozzles are very restrictive and probably best suited for experiments with very strong pumps such as dual pumps or Iwaki RD-30s, you really need alot of pumping power to push through these nozzles. For a quick test of the nozzles, I tried the stock block, quad nozzle, and the 4.5mm for testing which you can see in the following thermal section. The 4.5mm nozzle was rumored to be one of the better nozzles on the V1, and the quad nozzle was just more of an experiment.
So overall the restriction with nozzle option ranges from more of a low/average with just the stock block to extreme depending on the nozzle. To see these effects, I would recommend trying them out in my new updated flow rate estimator, link below:
I also had some folks ask me to post all of the V1 and V2 nozzles in one chart. The following is a chart of that based on the equations I extracted from excel representing the data trendlines:
So overall the smaller nozzles are roughly the same restriction in either block as the nozzle becomes the significant restriction dominating the result. Some of the results however are swapped around like the 6.3mm nozzle, I suspect it may be the nozzle in the V2 result was not sitting entirely flush. One thing I noticed in testing the nozzles in the V2, the nozzles were not quite as snug as the V1 midblock so it was more difficult to make the nozzle sit down properly.
The V2 allows you to have an average to extreme restriction setup depending on the nozzle selected.
So overall the restriction with nozzle option ranges from more of a low/average with just the stock block to extreme depending on the nozzle. To see these effects, I would recommend trying them out in my new updated flow rate estimator, link below:
Thermal Test Method
For thermal testing I decided to try and follow suit of some excellent testing methods I've followed on xtremesystems.org. Forum member Niksub1 has developed a method of testing where he remounts the block several times to average out the error in mounting. I found his testing to be exemplary and his results were always very revealing just how important mounting multiple times is. I have some differences in my own method, but I'm following the same TAT 100% loading method and 5 mount process. Here are some of the specifics in my testing method:- 5 separate TIM applications and mounts averaged - This is not common, but extremely important. It's not uncommon at all to see mounting variations as high as 2 degrees or more, so with only one mount, that error is 2 degrees. When you mount 5 times and average those results, you've now reduced that error down a standard deviation of .8 to .4C. This is an exhaustive step, but a necessary one to make any sort of conclusion about comparisons less than 2C apart.
- Measure Core-Temp - Water In Delta - This factors out the variable of an ever changing ambient air temperature (A must without an environmental chamber).
- Logging Water and Core-Temps - Core-temps reading from TAT (Thermal Analysis Tool) or any other only have a resolution down to 1 degree and it's very common to see core temperatures fluctuate over several degrees. The only way to accurately get a measurement beyond the one degree posted resolution is to log those results over a long period of time. I've chosen to log temperatures over a 30 minute increment after warm up.
- Temperature Probes Deployed - I kept my sensors fairly basic, but I did run a few extra's just for interesting information. This includes a sensor for:
-
- Water In (Before CPU block) Dallas DS18B20 Digital one-wire sensors, and CrystalFontz CFA-633
- Water Out (After CPU block) Dallas DS18B20 Digital one-wire sensors, and CrystalFontz CFA-633
- Air In Bottom (Bottom inlet side of radiator) Dallas DS18B20 Digital one-wire sensors, and CrystalFontz CFA-633
- Air In Top (Top inlet side of radiator) Dallas DS18B20 Digital one-wire sensors, and CrystalFontz CFA-633
- C2D Core1 and Core 2 Temps via TAT (Intel Thermal Analysis Tool)
- The Dallas DS18B20 Digital one-wire sensors that were used as noted above have a specified absolute accuracy of .5C with a .2C accuracy between 20 -30C temperature range. They also have resolution down to .0625C which is very good, and because they are digital they are not affected by the wiring or length of wire like thermocouples are.
- The CrystalFontz CFA-633 is an LCD with up to 32 channels of monitoring and logging capability. It logs temperatures of each channel on a one second interval, so over a 30 minute test, I'll have about 1,800 entries noting time and temperature of each channel. These are then averaged for a fairly accurate number.
- Pump - Laing D5 (Swiftech MCP 655) Setting 5. Stronger pumps tend to favor more restrictive blocks and smaller pumps tend to favor low restriction blocks. The Laing D5 is a very good and common pump, similar performance to a DDC with Top. I think this pump represents the pumping power available to most users and gives a fair comparison.
- Radiator - Swiftech MCR320 with 5/8" x 3/8"NPT barbs, Yate Loon D12SL12 (Petra Curved Blades) running at 12.0V. The radiator selected is a good radiator, but nothing extremely restrictive nor extremely free flowing, so I thought it fits well with the thought of testing with equipment that most folks would have available. In the end, since I measured water to core deltas, the actual radiator thermal performance doesn't impact the end result, but the data was collected regardless for information.
- TIM Material - TIM Consultants T-C Grease 0098- I wanted an easy to use past that performed well, and the T-C grease is the best I've used that cures almost instantaneously and it provided performance that was a good 3 degrees better than arctic ceramique in my initial tests. I used a thin layer method over the core area since the compound comes in a small bottle as opposed to a syringe. This is excellent TIM compound and I figured the better the compound, the more consistency in mounting which is very important in testing. The more I use this compound the better I like, I would highly recommend trying this compound, it provides very good results and comes in either a small jar or your typical syringe style applicator.
- Scythe Scurk1 back-plate - This Scythe backplate has been on my system for a while now, and I'm a firm believer in using back-plates. Most blocks don't come with backplates, so this one has served me well for some time.
- Same mounting hardware. I used 6-32 studs, nylon washers, and thumbscrews from a Danger Den mounting kit that I like. Each mount was done horizontally with the MB laying flat for good centering and the block was mounted with the thumbscrews. I am now using Danger Den springs which when measured on my scale fully compress at just over 9lbs of force. Each of these springs is tightened until just past being fully compressed so the overall block pressure is roughly 40lbs of force.
- TAT 100% processor Load - I use TAT 100% simply because it is the most severe testing of the processor available, many say it typically loads a processor beyond it's normal power consumption specification. This helps better measure small differences between blocks, but it should also be noted is scaled for this extreme loading scenario which might be similar to folding, but other common applications would have lower differences. For example a comparison difference of 1 degree at the test method would likely only be .8 degrees in a more real world 80% processing power depending on the task at hand.
- Warm Up - Almost no curing was done for this testing as I found there was almost no difference between 10 minutes of warm-up and curing and 8 hours of curing using the T-C Grease 0098. I simply mounted, turned the system on until all the normal processess were started. Then I allowed a 10 minute warm-up of TAT running at 100% before logging of temperatures was started.
- Lapped IHS - My E6600 has been lapped flat down to 1000 grit to ensure a true and flat surface. The stock intel IHS can be very irregular, some are convex, some are concave, some are wavy, and some are fairly flat. Lapping a processor voids it's warranty, but it ensures a nice flat surface for optimal heat transfer. My particular processor has been lapped. A complete stock IHS may benefit more from a bowed block than my samples because it is flat.
- Case Mounted - For testing I left my Evga 680i motherboard mounted in my Thermaltake Armor case and simply put it on it's side on blocks leaving the case top open. This allow me to access the CPU block and mount on the horizontal which improve mounting consistency.

In the end I simply take the entire collection of data and average the results for each item measured.
Thermal Test Comparison
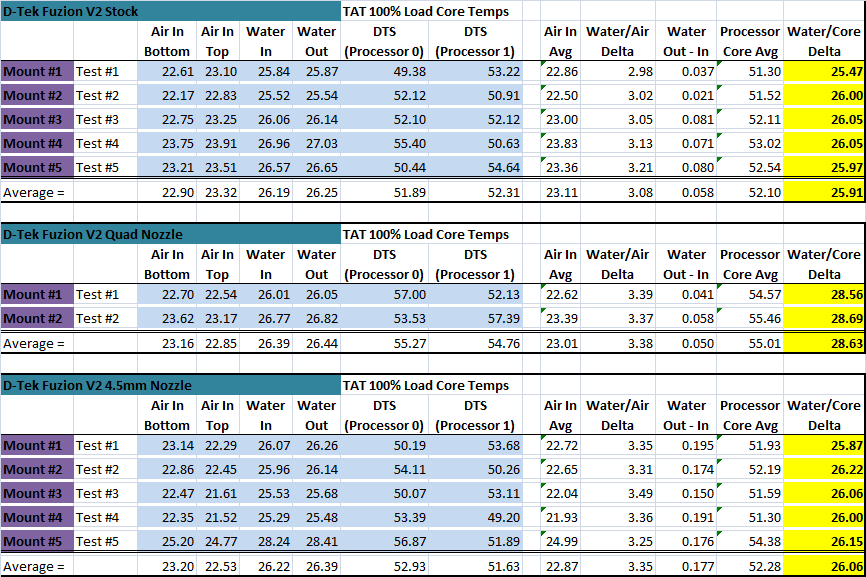
First up is the performance Tables for the Fuzion V2, this includes the 5 mounts that were tested for both the stock fuzion V2 as well as the V2 with the 4.5mm nozzle. I didn't inlcude the results in my line graph, but you can also see I tested the quad nozzle for two mounts worth before giving up on the idea, it's clearly not something you want to use for a dual core processor (quads only). As you can see my ambient temperatures vary alot, but carefully logging all the temperatures including water temperatures and only comparing the difference between water/cores appears to correct for that very well.If you are interested in my other block tests tables, I have those tabular results posted here including the D-Tek Fuzion V1, the XSPC Edge Acrylic, and the Aqua Computers double impact.
And here are the 5 mounts plotted and compared to previous testing that was done using the same testing methods:
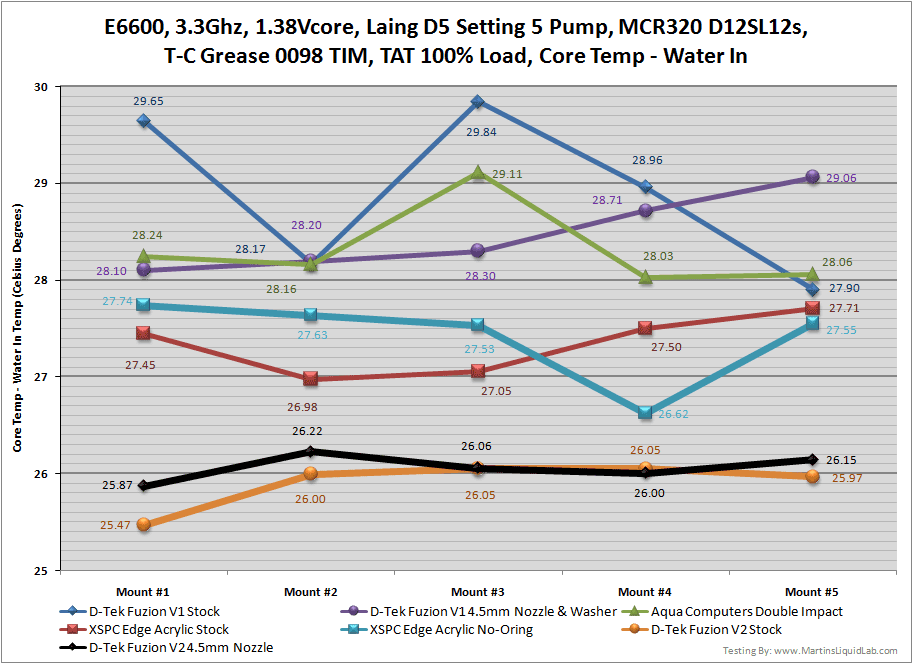
Mounting consistency is very much improved on the new solidly attached hold down plates.
And now to take the multiple mounts and average those to one single 5 mount average number:
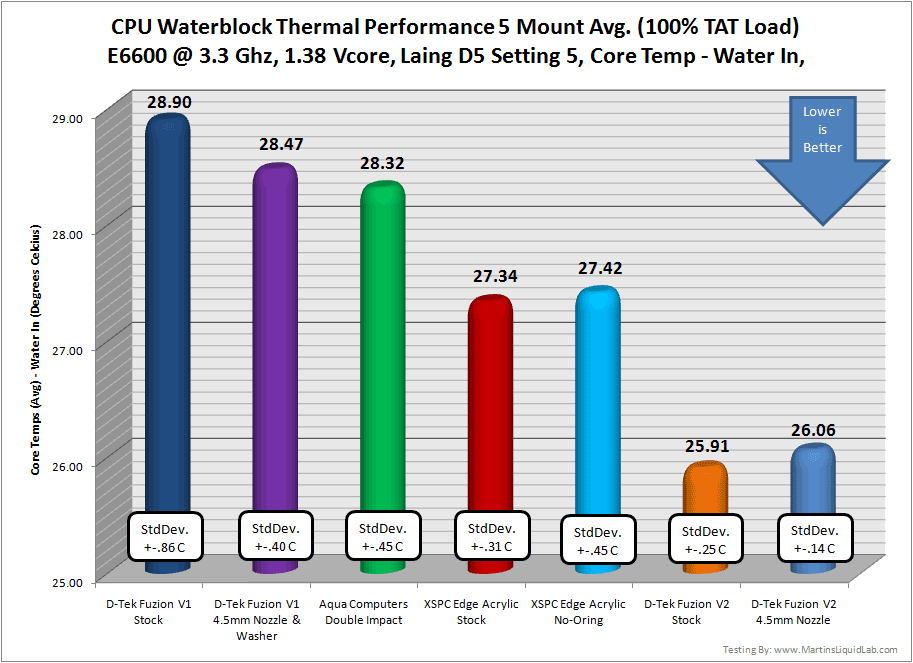
The new V2 is performing exceptionally well in stock form on my lapped dual core processor, it's also doing so with much higher consistency than the old V1, so the changes in mounting hold down plates are showing their advantages as well. Overall stock V1 to stock V2 is showing nearly a full 3 degrees of improvement, part of which I would attribute to the internal midplate redesign with integrated o-ring, but also the thermally optimized base changes in pin height and base thickness surely play a big role in the improvements. My Fuzion V1 with washer and nozzle only performed about .4C better than the stock V1, so the base redesign is likely
So there you have it, the new D-Tek Fuzion V2 is performing extremely well on a lapped dual core processor.
What about the nozzles?
I also did not see any measurable benefit from using the 4.5mm nozzle, the net difference was .17C higher temps using the nozzle, but that's within mounting deviations of testing using 5 mounts. It's possible there could be a very small gain, but it was not measurable using the 5 mount method and the particular pump I used. I initially intended to try more nozzles out and zero in on an ideal for this pump, but I questioned the value after seeing the 4.5 and quad nozzle was not showing a measureable difference. Using a dual core processor and pump similar to a Laing D5, I would simply recommend using the stock block. Perhaps with a really strong pumping system or quad cores, the nozzles have a more measurable improvement. I would still encourage people with different pumping systems or different cores to experiment with nozzles, I've only been able to show you how it reacts with my particular setup. If I had an Iwaki or running dual pumps in series I think it would be worthwhile trying some of the smaller nozzles, quad cores I suspect the quad mid plate may work best.
What about more bowing, a thicker o-ring?
I am currently working some runs to check what happens if the stock o-ring is replaced with a larger/thicker o-ring. The first few mounts are not showing any measurable improvement, so I suspect using a flat lapped processor does not benefit from this mod. If your IHS is convex or wavy, it may show some gains from doing so, but so far I can not see improvement on my lapped flat processor.
Pros
- The best dual core processor thermal performance tested to date.
- Based on the previously outstanding D-Tek V1 block, but improved.
- Average Restriction without nozzles - Considering the high thermal performance, restriction is still fairly small and would perform well in many setups.
- Attached Hold Down Plate and Pro Mount included - Makes installation easier and provides more consistently good mounts.
- Back-plate is INCLUDED!!! VERY NICE!!
- Delrin (Black Acetal) top, steel hold down, and brass screw inserts ensure long term durability.
- High quality oversized D-Tek barbs with o-ring retainers to prevent o-ring displacement.
- High quality fabrication, overall quality is superb except for the base screws.
Cons
- Easily Stripped Screws - I had trouble and had to be extremely careful with the bottom allen head screws, I would suggest replacing them if you plan to take it apart very often..
- Average Restriction - 3.7X more restrictive than the V1 without washer.
- Very restrictive when combined with smaller nozzles.
- Extra accessory costs not included. Nozzles and quad midplate must be purchased separately.
- Nozzle performance not measurable in tested setup - 4.5mm nozzle tested did not perform better than stock.
- Pro mount requires motherboard removal if installed using front mounting screws preinstalled.
Bottom Line
The new D-Tek V2 may at first look like a minor cosmetic top upgrade which would be acceptable considering how well the V1 performs, but it's much more than that. D-Tek has spent a fair amount of time taking all the good from V1, building upon that work and making it even better for the new version. The thermal performance gains in the new version over V1 were surprising to me, and exceeded my expectations...I'm impressed!Dual Core Testing Results
The V2 performed almost 3 degrees better in stock form than the V1 did stock, that's a very substantial improvement! It is now more of an average restriction block, so it's no longer extremely free flowing as it once was. Overall the V2 fixes all of the little things that the V1 missed, and the only downside left is those base screws. For dual core processors, the D-Tek Fuzion V2 in a single CPU only block loop will afford you the best thermal performance, it is superb and I would recommend using the block stock without nozzles.The D-Tek Fuzion V2 is the best thermal performing block I have tested on a dual core processor.
Quad Core Result (Coming Soon)
.
Unfortunately you can't always assume a block that perform one way on a dual core will perform the same on a quad core. I am however in the process of aquiring a quad core processor to start testing with. When I complete those results I will update my results here with that information. Stay tuned....Where to buy
Sidewinder Computer Systems