

XSPC Edge Acrylic CPU Waterblock Preview
Introduction
Welcome to my pressure drop and thermal testing of the XSPC Edge Acrylic CPU water-block designed for a wide range of processors. This is a preproduction prototype copy, so some slight changes may occur before the final production models are run.
I would like to give special thanks to Paul from XSPC for providing me with a sample to test, I have yet to try and XSPC product that didn't impress me. Being an engineer, I tend to take notice of the small tweaks here and there that make a product perform well, and XSPC obviously spends a lot of time working on improving their own designs and it shows.
Block Characteristics
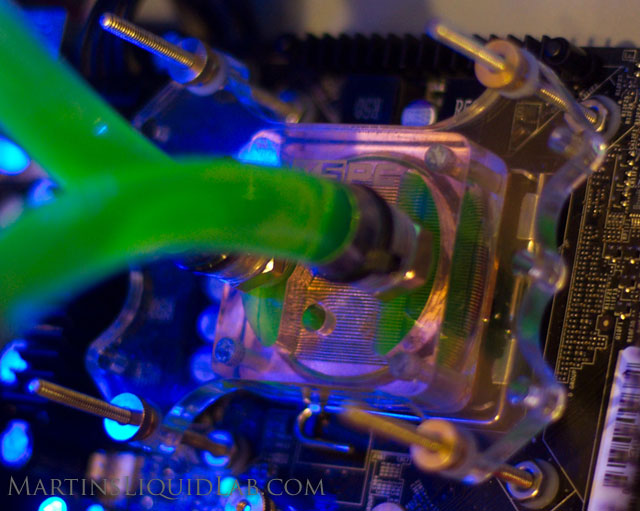
The block is a finely CNC machined block consisting of a solid copper base with tall .3mm micro-channels and a side to side inlet to outlet flow path with large flow spreader chambers at each barb entry. While I only have an E6600 to test with, this large distributed flow path and deep micro-channel design should also be very well suited for cooling large surfaces like quad core processors. The top is constructed from two pieces of acrylic for a clear view of the interior and a predrilled LED location for lighting (Blue LED included).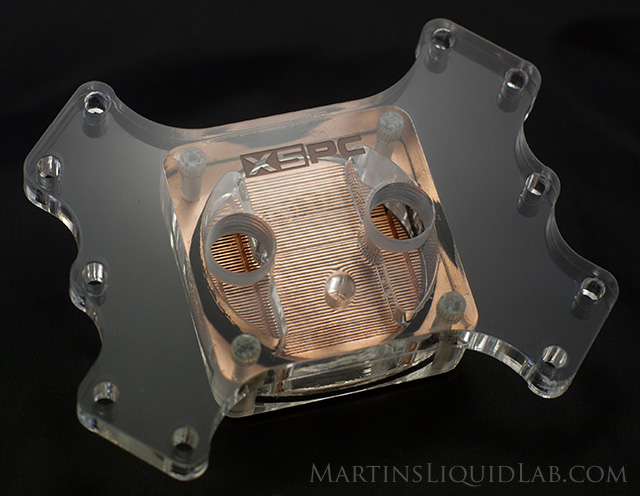
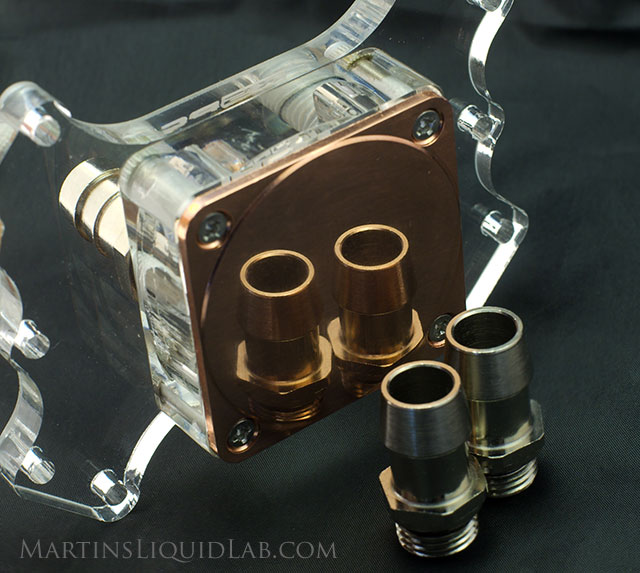
The middle and Acrylic Top are fused as one, barb to barb spacing is large and should accept any barbs.
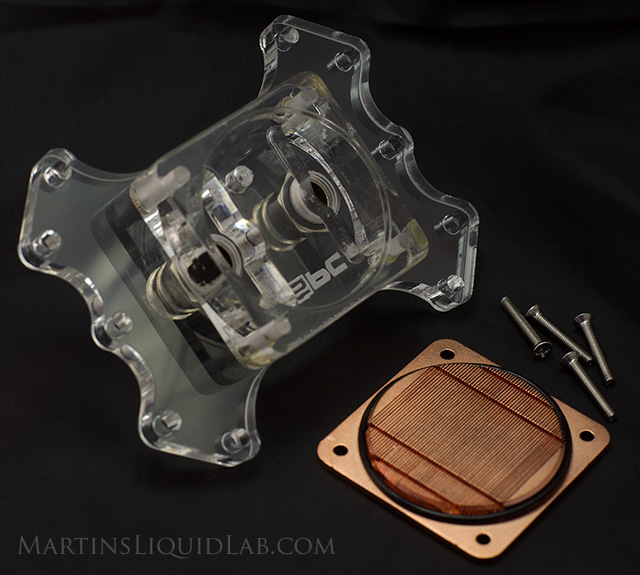
The base is easily accessible for cleaning by removing four screws. Also comes with your typical block screw studs, also includes a small tube of TIM grease, and one blue LED. Testing the LED seemed to produce a bright blue light, although my particular LED seemed to get very warm at the resistor, so test yours out before permanently installing.
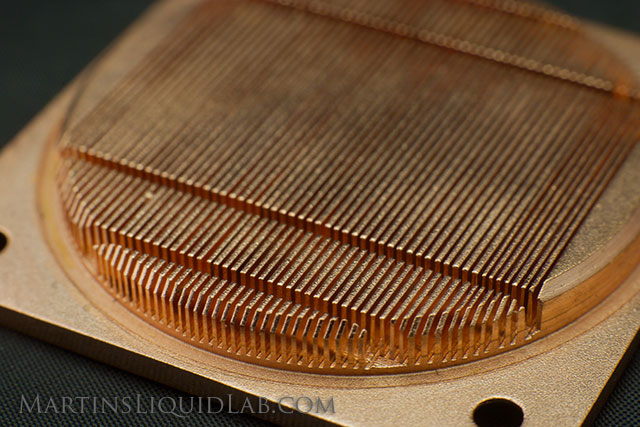
The fins are cut with approximately a .3mm slotting saw and very tall compared to other bases. This is very difficult machining, but provides a very large heat transfer surface area. This is reaching the limits of what you can do machining soft copper and requires very fine and time consuming cuts.
The base is also nicely finished and stepped similar to the micro-channel fins up top. Screws are easily removed for access.
Hydraulics and Pressure Drop Testing
The most scientific way to determine a blocks hydraulic resistance is to test pressure drop. Pressure drop is a measurement of pressure loss across a block that varies with flow rate. This is basically a measurement of energy loss, and directly influences how much flow rate you will have.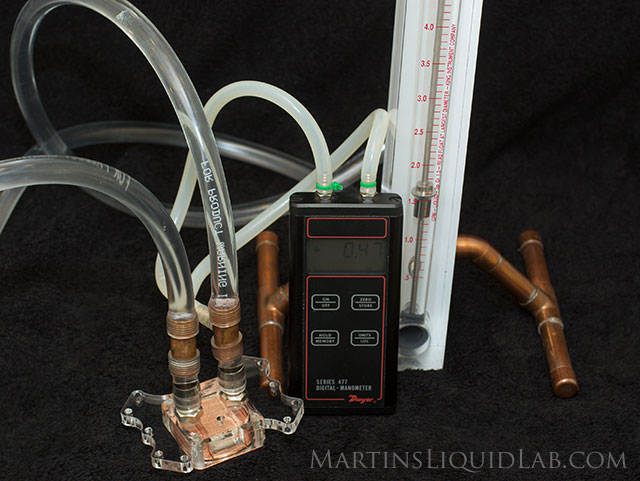
Equipment:
- Dwyer Digital Manometer 477 Mark IV - Accuracy .5% of Full Scale. Range 0-20.00 PSI range, Resolution .01 PSI
- King Instruments 7520 Series 0-5GPM, 250mm scale - Accuracy 2% of Full Scale. Range 0-5GPM, Resolution .1 GPM (can be interpolated to .02GPM)
- Water Source - Household water pressure - 50PSI at >5GPM - Because flow rate readings are instantaneous, household tap water and water pressure are a good and powerful source for pressure drop testing.
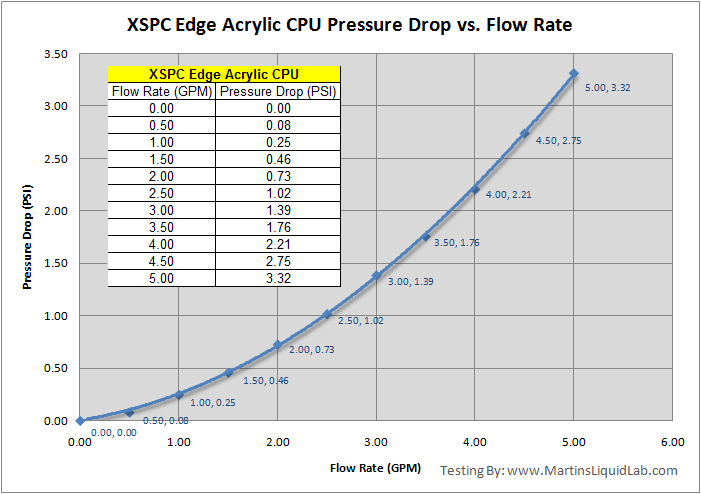
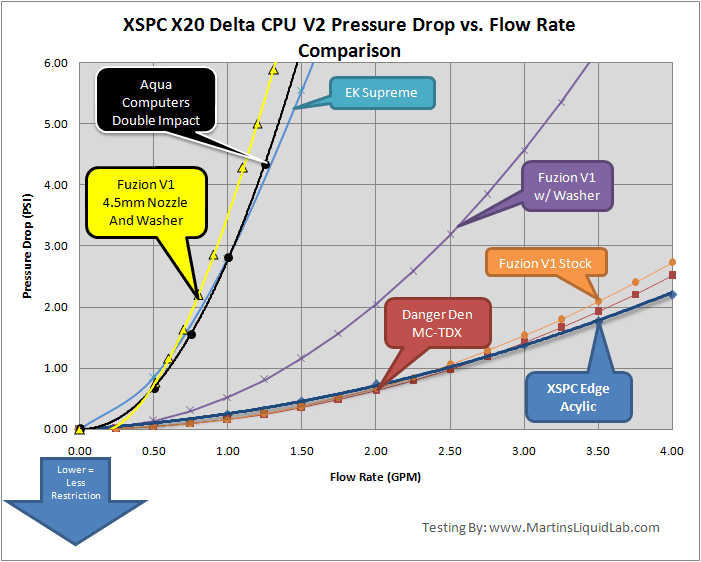
LOWER IS BETTER
LOWER IS BETTER
Pressure drop is excellent and very similar to the other two top blocks for being the least restrictive CPU block on the market. The XSPC Edge Acrylic is an extremely low restriction CPU block which is ideal for use in multiple block loops or for systems with smaller pumps.
Thermal Test Method
For thermal testing I decided to try and follow suit of some excellent testing methods I've followed on xtremesystems.org. Forum member Niksub1 has developed a method of testing where he remounts the block several times to average out the error in mounting. I found his testing to be exemplary and his results were always very revealing just how important mounting multiple times is. I have some differences in my own method, but I'm following the same TAT 100% loading method and 5 mount process. Here are some of the specifics in my testing method:- 5 separate TIM applications and mounts averaged - This is not common, but extremely important. It's not uncommon at all to see mounting variations as high as 2 degrees or more, so with only one mount, that error is 2 degrees. When you mount 5 times and average those results, you've now reduced that error down a standard deviation of .8 to .4C. This is an exhaustive step, but a necessary one to make any sort of conclusion about comparisons less than 2C apart.
- Measure Core-Temp - Water In Delta - This factors out the variable of an ever changing ambient air temperature (A must without an environmental chamber).
- Logging Water and Core-Temps - Core-temps reading from TAT (Thermal Analysis Tool) or any other only have a resolution down to 1 degree and it's very common to see core temperatures fluctuate over several degrees. The only way to accurately get a measurement beyond the one degree posted resolution is to log those results over a long period of time. I've chosen to log temperatures over a 30 minute increment after warm up.
- Temperature Probes Deployed - I kept my sensors fairly basic, but I did run a few extra's just for interesting information. This includes a sensor for:
-
- Water In (Before CPU block) Dallas DS18B20 Digital one-wire sensors, and CrystalFontz CFA-633
- Water Out (After CPU block) Dallas DS18B20 Digital one-wire sensors, and CrystalFontz CFA-633
- Air In Bottom (Bottom inlet side of radiator) Dallas DS18B20 Digital one-wire sensors, and CrystalFontz CFA-633
- Air In Top (Top inlet side of radiator) Dallas DS18B20 Digital one-wire sensors, and CrystalFontz CFA-633
- C2D Core1 and Core 2 Temps via TAT (Intel Thermal Analysis Tool)
- The Dallas DS18B20 Digital one-wire sensors that were used as noted above have a specified absolute accuracy of .5C with a .2C accuracy between 20 -30C temperature range. They also have resolution down to .0625C which is very good, and because they are digital they are not affected by the wiring or length of wire like thermocouples are.
- The CrystalFontz CFA-633 is an LCD with up to 32 channels of monitoring and logging capability. It logs temperatures of each channel on a one second interval, so over a 30 minute test, I'll have about 1,800 entries noting time and temperature of each channel. These are then averaged for a fairly accurate number.
- Pump - Laing D5 (Swiftech MCP 655) Setting 5. Stronger pumps tend to favor more restrictive blocks and smaller pumps tend to favor low restriction blocks. The Laing D5 is a very good and common pump, similar performance to a DDC with Top. I think this pump represents the pumping power available to most users and gives a fair comparison.
- Radiator - Swiftech MCR320 with 5/8" x 3/8"NPT barbs, Yate Loon D12SL12 (Petra Curved Blades) running at 12.0V. The radiator selected is a good radiator, but nothing extremely restrictive nor extremely free flowing, so I thought it fits well with the thought of testing with equipment that most folks would have available. In the end, since I measured water to core deltas, the actual radiator thermal performance doesn't impact the end result, but the data was collected regardless for information.
- TIM Material - TIM Consultants T-C Grease 0098- I wanted an easy to use past that performed well, and the T-C grease is the best I've used that cures almost instantaneously and it provided performance that was a good 3 degrees better than arctic ceramique in my initial tests. I used a thin layer method over the core area since the compound comes in a small bottle as opposed to a syringe. This is excellent TIM compound and I figured the better the compound, the more consistency in mounting which is very important in testing.
- Scythe Scurk1 back-plate - This Scythe backplate has been on my system for a while now, and I'm a firm believer in using back-plates. Most blocks don't come with backplates, so this one has served me well for some time.
- Same mounting hardware. I used 6-32 studs, nylon washers, and thumbscrews from a Danger Den mounting kit that I like. Each mount was done horizontally with the MB laying flat for good centering and the block was mounted with the thumbscrews all tightened to same point where the teeth on the thumbscrew start slipping through my fingers, so it's a fairly aggressive hard-mount. I don't have anything to measure mounting pressure I simply tightened by feel until the mounting screws started hurting the skin on my fingers a touch.
- TAT 100% processor Load - I use TAT 100% simply because it is the most severe testing of the processor available, many say it typically loads a processor beyond it's normal power consumption specification. This helps better measure small differences between blocks, but it should also be noted is scaled for this extreme loading scenario which might be similar to folding, but other common applications would have lower differences. For example a comparison difference of 1 degree at the test method would likely only be .8 degrees in a more real world 80% processing power depending on the task at hand.
- Warm Up - Almost no curing was done for this testing as I found there was almost no difference between 10 minutes of warm-up and curing and 8 hours of curing using the T-C Grease 0098. I simply mounted, turned the system on until all the normal processess were started. Then I allowed a 10 minute warm-up of TAT running at 100% before logging of temperatures was started.
- Lapped IHS - My E6600 has been lapped flat down to 1000 grit to ensure a true and flat surface. The stock intel IHS can be very irregular, some are convex, some are concave, some are wavy, and some are fairly flat. Lapping a processor voids it's warranty, but it ensures a nice flat surface for optimal heat transfer. My particular processor has been lapped. A complete stock IHS may benefit more from a bowed block than my samples because it is flat.
- Case Mounted - For testing I left my Evga 680i motherboard mounted in my Thermaltake Armor case and simply put it on it's side on blocks leaving the case top open. This allow me to access the CPU block and mount on the horizontal which improve mounting consistency.

In the end I simply take the entire collection of data and average the results for each item measured.
Thermal Test Comparison
This is my first mini roundup using this test method, so I selected the following blocks and configurations:- D-Tek Fuzion V1 Stock
- D-Tek Fuzion V1 4.5mm nozzle plus washer
- Aqua Computers Double Impact
- XSPC Edge Acrylic Stock
- XSPC Edge Acrylic O-Ring Removal Mod
Then to kick it up a notch, I decided to go with the highly recommended 4.5mm Nozzle and washer that you can purchase separately for the Fuzion. To do a similar mod, I decided I would try reducing the clearance over the XSPC micro-channel by removing the standard O-ring and sealing the base to the top via silicone gasket.
My results in tabular form as follows:
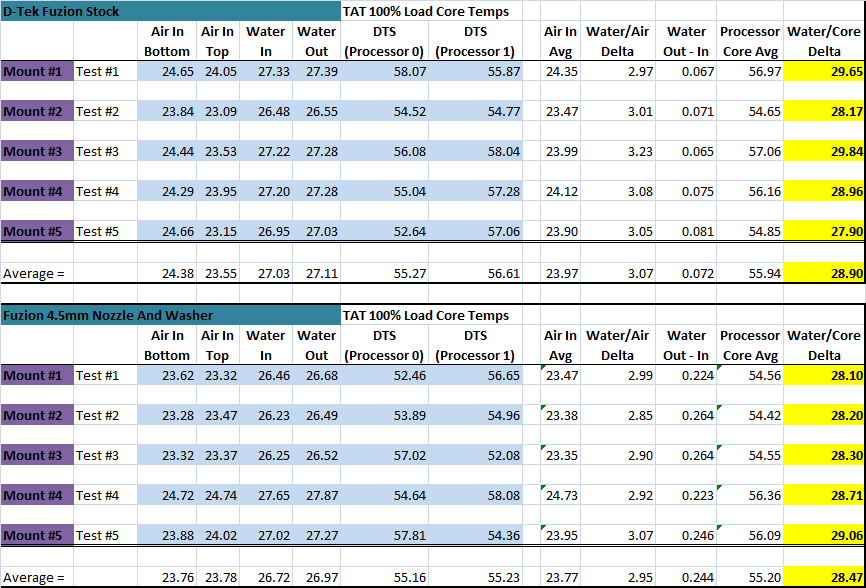
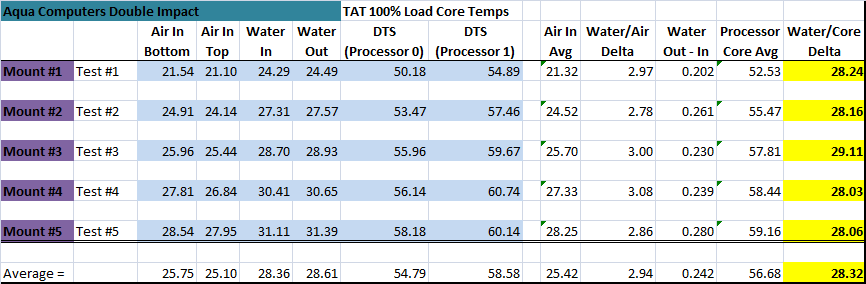
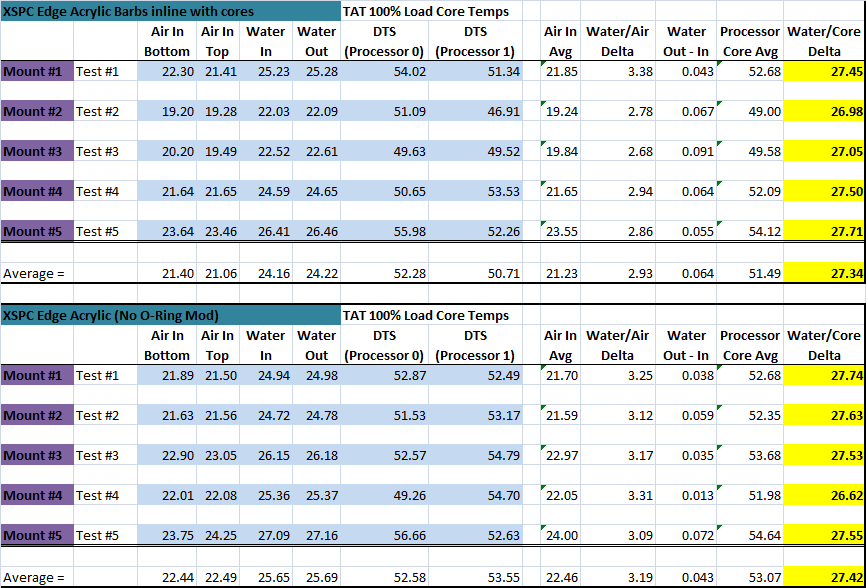
That's the tabular data with the other goods measured to give you an idea of the variability in ambients, radiator performance, and water in vs water out temps. The only thing very interesting is how the water In - Out delta as expected does increase as the flow rates are reduced with the more restrictive setups. The stock fuzion has a In/Out delta of only .07C, where the nozzle fuzion is .24C. Still very small, but reducing flow rate does increase the water delta in the system a little bit. If that same thing occurs over a long string of blocks, it could add up a little and start having some effect on the last few blocks in the loop. Other than that the Fuzion and the XSPC edge seemed to keep both cores within a couple of degrees of each other on average. The Aqua Computers runs however seemed to have a bit more differential with an average of about 4 degrees cooler on core 0 than core 1.
I should also note that my ambient temperature varied quite a bit through all this testing anywhere from 21C to 28C, but that didn't appear to have any impact on the water/core delta, so logging of the water temperature concurrently seems to do a good job at removing that variable fairly well.
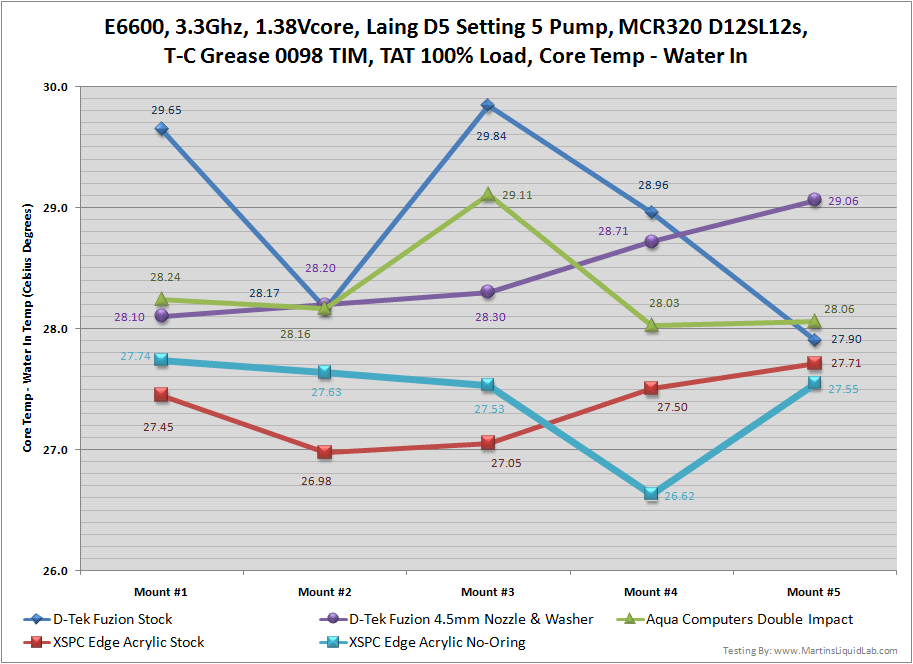
Ok, well enough of numbers, lets take a look at the 5 mounts in line form:
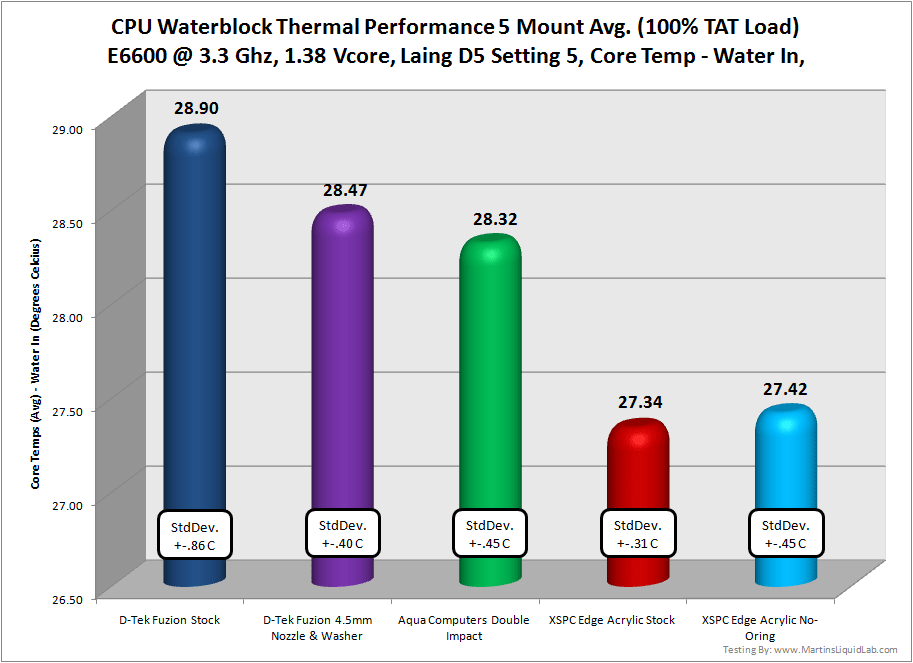
Now to reduce this data and average the 5 mounting run results, the following bar chart is provided:
So with this, I had the following observations:
I should also note that my ambient temperature varied quite a bit through all this testing anywhere from 21C to 28C, but that didn't appear to have any impact on the water/core delta, so logging of the water temperature concurrently seems to do a good job at removing that variable fairly well.
Ok, well enough of numbers, lets take a look at the 5 mounts in line form:
LOWER IS BETTER
This chart clearly shows how important multiple mounts are. Even though I was very consistent with TIM application and mounting method, 5 mounts is still the bare minimum to make any sort of conclusions as the results vary alot between mounts. Every block tested had at least a 1C maximum difference between mounts and the stock fuzion test had almost 2C differences. This just confirms that Niksub1's 5 mount method is really a MUST, even better would be 10. Now to reduce this data and average the 5 mounting run results, the following bar chart is provided:
LOWER IS BETTER
On the bottom of each bar you can see the standard deviation of the results averaged to get that result. You can think of this as a level of uncertainty for the result or a +- potential in error, most of which is due to mounting variance.So with this, I had the following observations:
- XSPC Edge Acrylic is an extremely strong performer; it provided roughly 1 degree over the other block configurations tested.
- O-Ring removal mod on the XSPC edge didn't really produce any consitant performance advantage, with a .45C standard deviation; the accuracy wasn't there to conclude anything from the test. It appears there is plenty of flow rate and turbulence with the stock setup.
- Fuzion 4.5mm nozzle and washer didn't provide as much of a gain as I had hoped, perhaps a larger nozzle or quad nozzle works better. The nozzled with washer fuzion performed about .4C better than stock. This would indicate that either flows are high enough in the stock configuration that the nozzle acceleration doesn't help much, or the Laing D5 doesn't have match that well with the very restrictive 4.5mm nozzle. Other nozzles may provide better results than this option. I think perhaps a 5.5mm nozzle or quad nozzle may be optimal, but difference are hard to measure with the standard deviations present without probably testing even more than 5 mounts.
- Aqua Computers Double Impact is also a strong performer. With the standard deviations present it performed roughly the same as the 4.5mm nozzled fuzion with washer although as noted previously the fuzion held temperatures across the cores more evenly.
Pros
- Exceptionally Low Pressure Drop - Great for all applications including multiple block loops
- Exceptional Thermal Performance
- High Efficiency - Both excellent pressure drop AND thermal performance in one.
- Large Cooling Area - Provides great cooling potential for single, dual, and quad cores.
- Attached Hold Down Plate - Minimizes fumbling with a loose hold down plate for easier and more consistent mounts.
- Easy base removal for cleaning access
- No Nozzles - Some folks just want the best performing option, since there is only one option...it's very simple performance.
- Acrylic view provides an easy visual that the block channels are clean.
Cons
- Acrylic Top - While it's a fairly thick top, Acrylic is not as durable or crack resistant as Delrin(acetal) or Brass. Currently the block is only available in acrylic, although I've heard there may be plans for an LGA775 Delrin top in the works.
- No Nozzles - Some folks like to tinker with different nozzles and customize their block for thier processor.
Bottom Line
The XSPC Edge Acrylic CPU waterblock is an exemplary peformer and manages to do so by providing exceptional low restriction and thermal performance in one without the typical tradeoffs between the two areas. Great news for the water cooling community!!Where to buy
XSPC Retailers Link