1977 Pontiac Bonneville Heatercore Radiator for PC Cooling Review
Introduction
Welcome to my review of the 1997 Pontiac Bonnie Heatercore. I would like to give special thanks to Dryadsoul from OCnet for donating this heatercore for testing
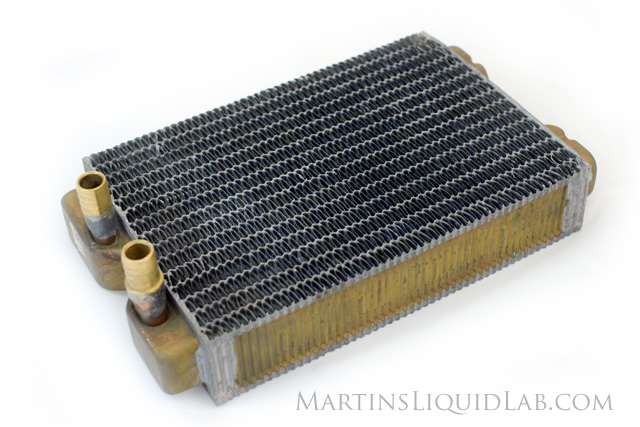
Sorry for the poor heatercore condition, this heatercore is used and no longer representing what you might buy new. The brass barbs were soldered into place myself, but like any of these heatercores, if you wanted them to look nice and painted, you'll need to plan on painting them yourself.
Radiator Characteristics
The radiator is a common car type heatercore that is used to transfer heat from a car's hot coolant to the inside of the car. It just so happens than the 1977 Pontiac Bonneville Heatercore is a great size at it is just the right length for two 120mm fans and building a shroud will make those fans use the added width as well.- Copper Fins 100ea in 9.125"(11 folds per inch)
- 14 each "Corrugated" brass tubes. Note the tubes are corrugated to keep fin spacing even and this likely also helps turbulence/heat transfer within.
- Brass Chambers
- Barbs either have to be fabricated using household brass fittings, or you can buy a heatercore with fittings preinstalled from Danger Den here.
- No Paint
- 6-1/2" width
- 10-7/8" height
- 2" (50mm) thickness
- 3lb 4.7 ounces (without barbs) weight
This makes these heatercores similar to the more dense and double thickness radiators like the HWlabs BIX and GTX series in that they will be optimal with higher pressure 38mm and higher speed fans (>2000RPM).
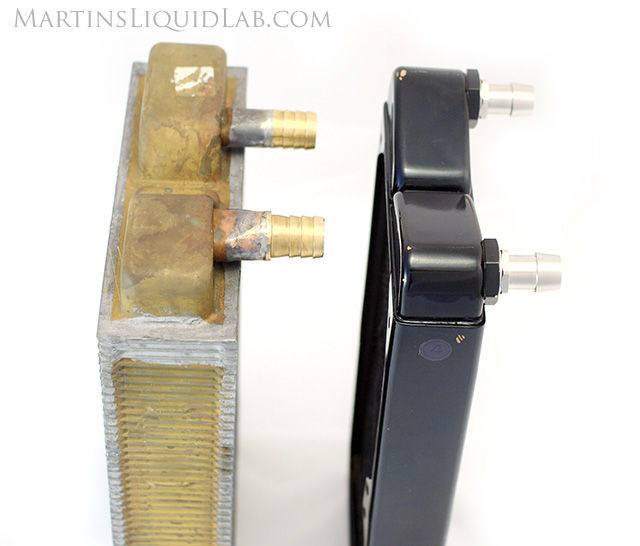
Bonnie Heatercore- 2" (50mm) thickness left. Vs. (MCR220) .83" (21mm) thickness right.
The heatercore is 2.4X as thick as a normal slim radiator core.
Unfortunately the heatercore doesn't come with a premade radiator shroud or fan mount, so you'll have to make your own.
Hydraulics and Pressure Drop Testing
The most scientific way to determine a blocks hydraulic resistance is to test pressure drop. Pressure drop is a measurement of pressure loss across a radiator that varies with flow rate. This is basically a measurement of energy loss, and directly influences how much flow rate you will have.Equipment:
- Dwyer Digital Manometer 477 Mark V - Accuracy .5% of Full Scale. Range 0-20.00 PSI range, Resolution .01 PSI
- King Instruments 7520 Series 0-5GPM, 250mm scale - Accuracy 2% of Full Scale. Range 0-5GPM, Resolution .1 GPM (can be interpolated to .02GPM)
- Water Source - Household water pressure - 50PSI at >5GPM - Because flow rate readings are instantaneous, household tap water and water pressure are a good and powerful source for pressure drop testing.
Previously tested on old test setup and very low pressure drop, but retesting on newer equipment for consistent data.
TESTING IN PROGRESS
TESTING IN PROGRESS
Thermal Testing Specifications
Rather than fill up this review page with specifications, I've created this radiator testing specificaitons page for that.Thermal Testing
I did my normal testing specifications except I only tested at one heat load and I also tested with a custom shroud in pull so I could make use of the full width these heatercores provide. Without a shroud a normal PC radiator already has a mini shroud in place to bolt the fans too and allow use of the whole radiator surface, but a heatercore does not. For this reason I think it's essential (not optional) on these heatercores to make your own shroud. I just made a quick cardboard shroud similar in shape and style to this.The following results were obtained:
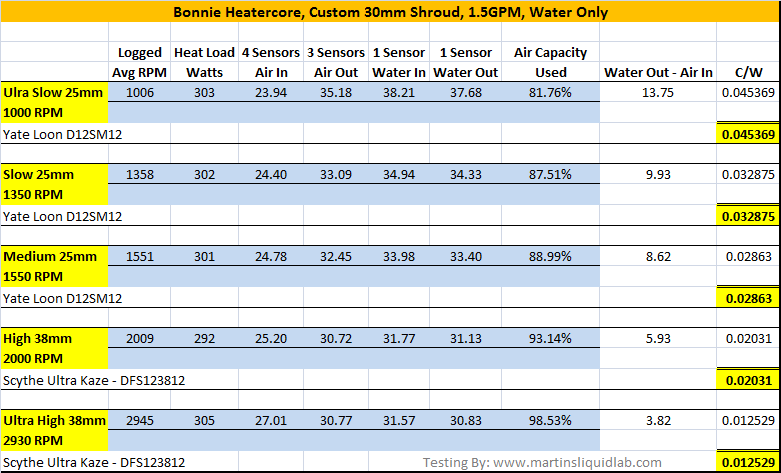
First are my tabular results which includes additional data like the air in and air out, etc.
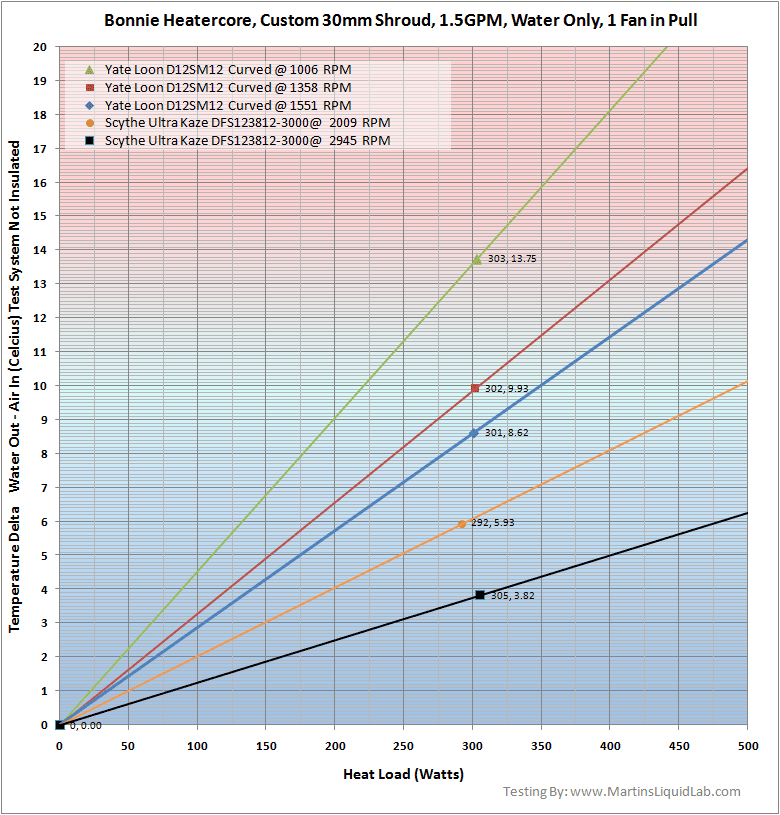
And this is the estimating chart where you can select a heat load in watts and get an estimated water temperature. For example assuming I was running a 200 watt quad core setup using Ultra Kaze fans at 2930RPM, I would get about a 2.5C delta. So if my ambient temperature was 20C, my water temperature would be around 22.5C.
To estimate a heat load you can use the following tools:
- Extreme Outer Visions PSU calculator - Just note heat load minus the 38 watts included in the start.
- Swiftech's Conroe/Kentsfield CPU calculator - This is actual an estimator for the kit, but it also gives what I think is a more accurate heat load for the processor. Just plug in the field and it will output a heat load in watts.
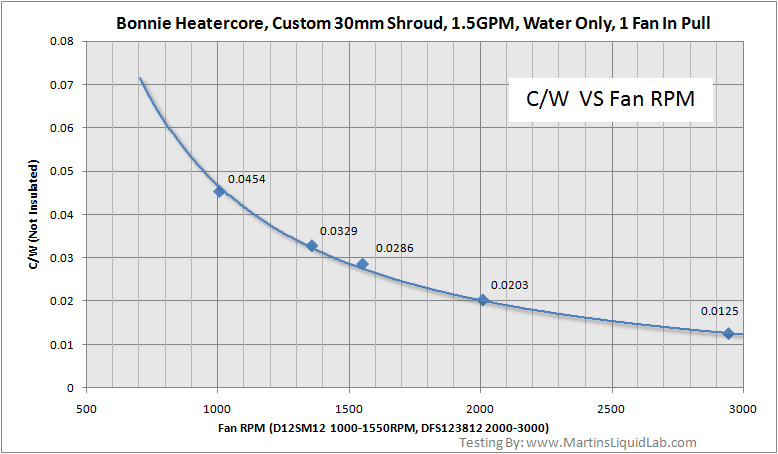
These are the c/w values plotted over the fan range, more than anything this just shows you the overall testing is following a fairly controlled trendline which is good. The heatercore is a bit different than many radiators in that the trendline still has a good slope to it at 3000RPM fans meaning it would still gain a good amount with even more fan power. Unfortunately it also looses performance rapidly under 1350RPM fans.
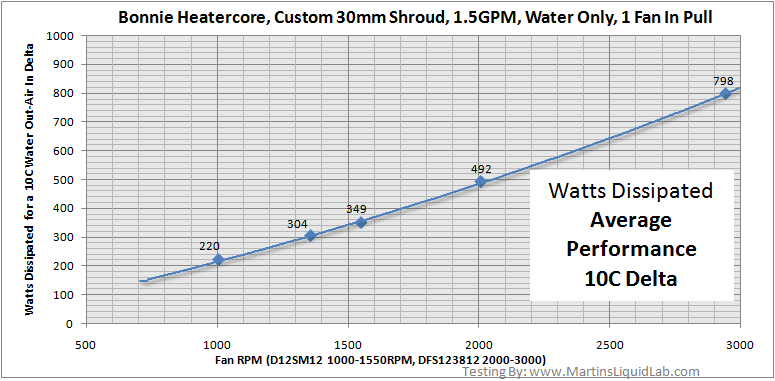
And everyone wants to know what heat dissipated is and for that you have to assume a delta (Water temperature out vs Air temperature In). This is what I call the 10C "Average Performance" delta where, where it's still good, but not an extreme setup where 5C deltas are desired. While most radiators start to drop off past 2000RPM, the heatercore appears to not only gain linearly, but curve upwards...it really likes strong fans.
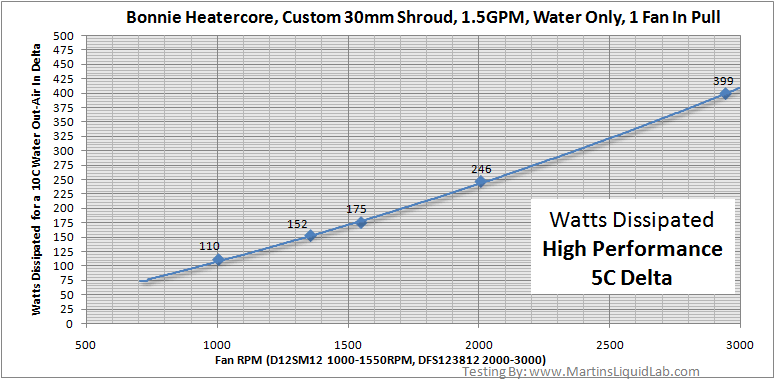
And this is the high performance 5C delta chart where water temperatures are very cool and would provide extreme cooling performance. Even though it's extremely strong with the ultra high speed fans, it's still doing ok with low speed fans. A single C2D processor overclocked might produces as much as 125watts between processor and pump, and this shows you could cool that down to a nice cool 5C delta with only 1350RPM fans. And with ultra high speed fans you could cool nearly 400watts of heat down to this high performance level.
Bottom line, if you have the skills/time to do a little handy work and fabricate your own barbs and your own shroud, the heatercore is an exceptional value and an impressive performer with high speed fans. Overall it performs somewhere in between a double and triple slim radiator with lower speed fans and on par or better than a slim triple radiator with high speed fans. The key to this is you have to build your own shroud and if you don't buy one with preinstalled barbs, you also need to have the necessary soldering skill to do that. It is what is it, a heater "Core" so you have to build the rest of what we consider a standard PC radiator.
Pros
- Extremely low cost
- Very low pressure drop - Great for adding into existing loops for multiple radiator setups.
- Excellent performance with high and ultra high speed fans, good performance with med/low speed fans
- Optimized for high, ultra high, (And HIGHER THAN ULTRA HIGH) speed fans. You can't over fan this radiator.
- Great project radiator for those with modding and metal crafting talents.
Cons
- Lack of "Bling" in stock form..:), no paint, no barbs, no place to screw fans into.
- Stock form comes with two different pipe sizes and no barbs unless ordered from Danger Den that way
- No standard 1/4" thickness shroud would mean poor performance without a custom shroud. Custom shroud is a must.
- No paint, overall a DIY project to make it a computer part.
Shroud and painting DIY building guide
\Here is an excellent shroud building guide for a heatercore just like this, it will give you a good idea how nice it can look when you are done too.OCnet - d3daiM's post on building a sheet metal shroud for a heatercore.
OCnet - soloz2's post on painting a bonnie heatercore the right way without painting the fins.
Where to buy
CORE ONLY -$29You can also check your local autoparts stores.
1/2" BARBS PREINSTALLED - $35