

Swiftech Apogee Drive CPU Water block & Pump Combo Review
Introduction
Welcome to my review of the Swiftech Apogee Drive CPU water block/pump combination designed for a wide range of processors. This is an actual production run copy that comes standard with an LGA775 mount and other mounts as well.
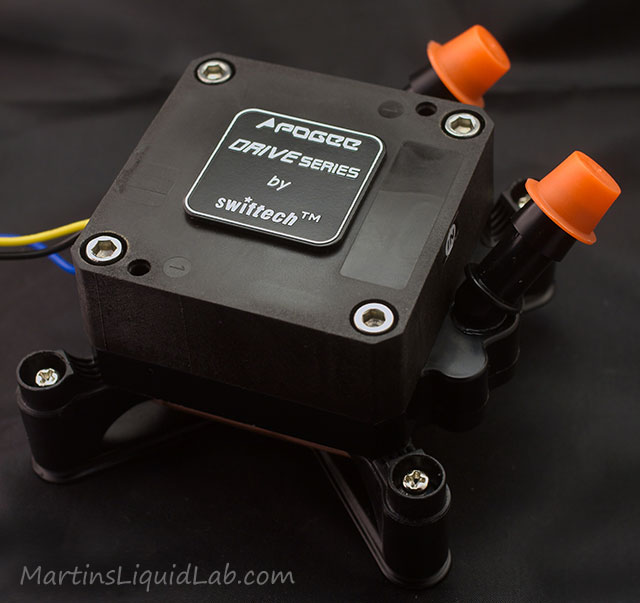
The above photo is the block and pump combination

If you haven't already checked it out, here is a new site for your watercooling needs. Watercooling.com!

Block Characteristics
The block and pump combo is rather unique in that it's basically two common and well regarded products integrated into one. First the water block is very similar and incorporates the same basic copper base as the Apogee GT and Apogee GTX water blocks. These water blocks have been high performing blocks and have provided many users years of great service. Second is the pump motor, it is a standard Laing DDC 3.1 10 watt pump motor which is the same thing as the Swiftech MCP 350, just rebranded. The fantastic part that excites me about this combo is the upgrade possibilities. Many people may stray from this product thinking they would have to throw away the entire product in the event they wanted a different water block in the future, but fortunately that is not the case here, and I'll explain more laterMy first order of review is looking at the packaging and accessories. This is the bundled box, it's about 4.5" cardboard cube that contains the block, accessories, and installation guides. While there wasn't any foam padding in the box, it appears the back plate mounted to the pump/block does a good job at protecting the base, although I still wouldn't mind seeing a bit more protection.
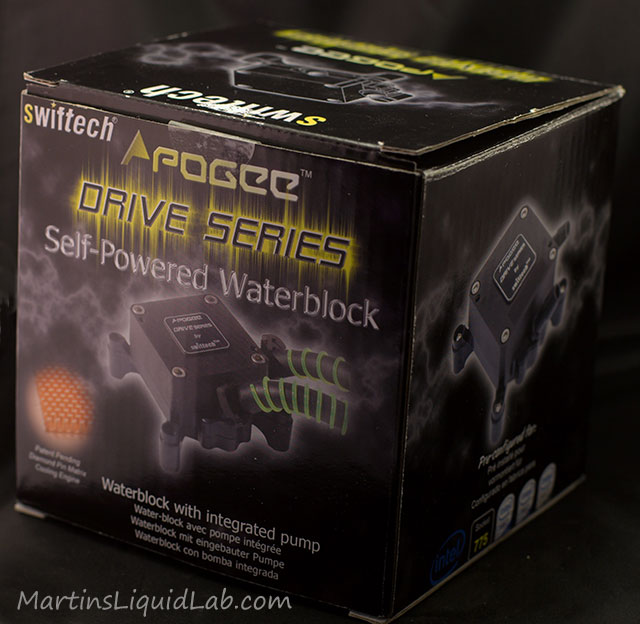
While I'm not a big fan of colorful packaging, it comes with the business in selling products retail, which Swiftech does regularly.

And here are the specifcations off the package, similar to the MCP-350 specs but slightly different because it has the block integrated.
And here are the specifcations off the package, similar to the MCP-350 specs but slightly different because it has the block integrated.
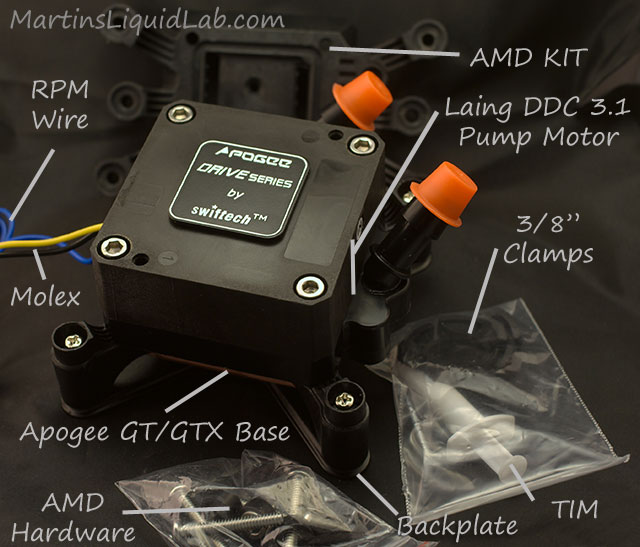
Swiftech really goes out of their way to give you everything you can possibly need to install the block and pump. Many blocks require you to make additional purchases like the back plate (which I think is absolutely necessary for every water block installation), not to mention the barbs, clamps, and thermal paste. Everything included here is good quality parts and should suffice to supply a wide range of users the necessary parts to install the system right.
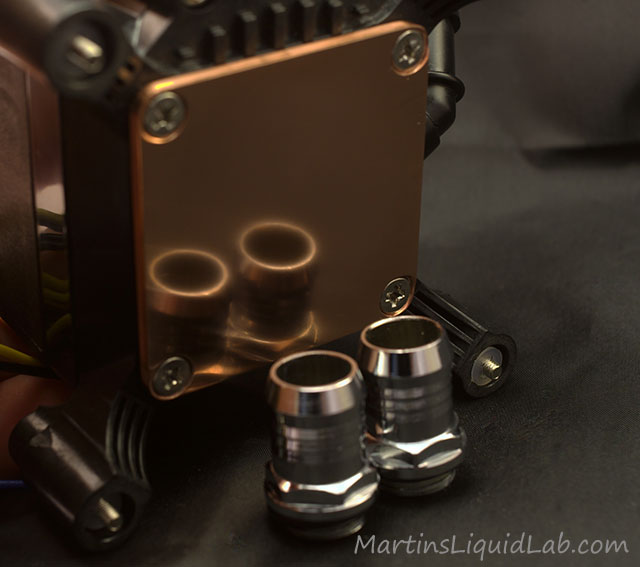
The base is not quite a mirror finish, but it is good and very slightly bowed around the center of the base.
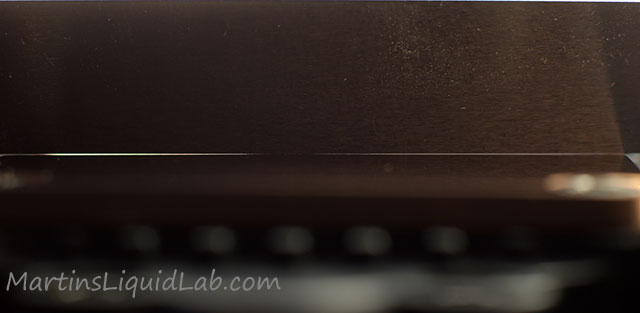
Here is a look at the bowing of the base; there is a very slight bow to the center.
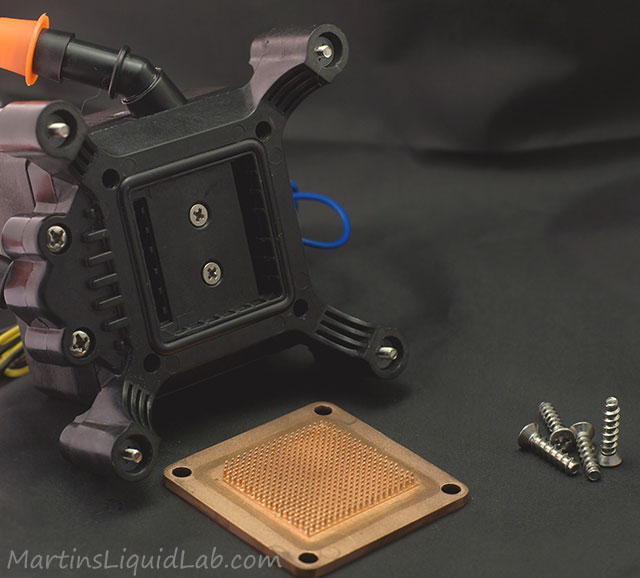
Here is a photo of the base removed; it is attached with four coarse threaded screws into the pump top. One interesting observation is how the flow is spread over two large slots. This is even a greater effort to spread the flow evenly over the entire base. This was easy enough to do, although the coarse screws don't provide the same machined quality as a fine screw with a tapped hole. Also note that the base has one corner of the pins removed, this ensures that the base can only be installed one way, so it's not possible to get it installed incorrectly. Above that is the pump top flow spreading chambers which are held to the pump motor via four large screws and two interior smaller screws. The actual pump motor can removed by four larger allen bolts on the other side of the pump.
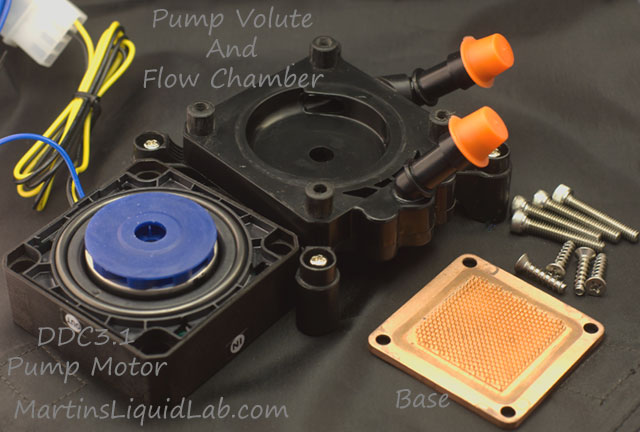
Removing the motor you are left with these components, Pump Volute and Flow Chamber still connected here.
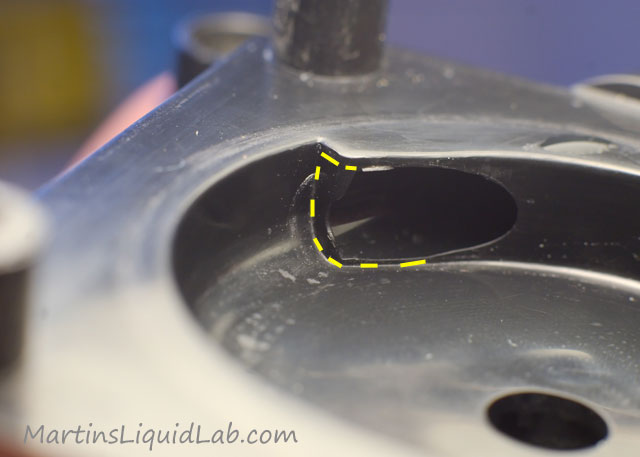
I did run into one QC issue, the pump volute exit has a bigger than expected casting flaw. This is just where part of the injection mold fits together and there was apparently a larger than normal gap present when this top was fabrication. So I took out my hand dremel and shaved off this lip approximately as outlined in yellow above. Having only one of these, I'm not sure if this is typical, but one forum member noted he didn't see anything this bad on his sample so this might just be the exception. The pump would still work fine without doing anything, but I have full blown tinkeritus and can't help myself..:)
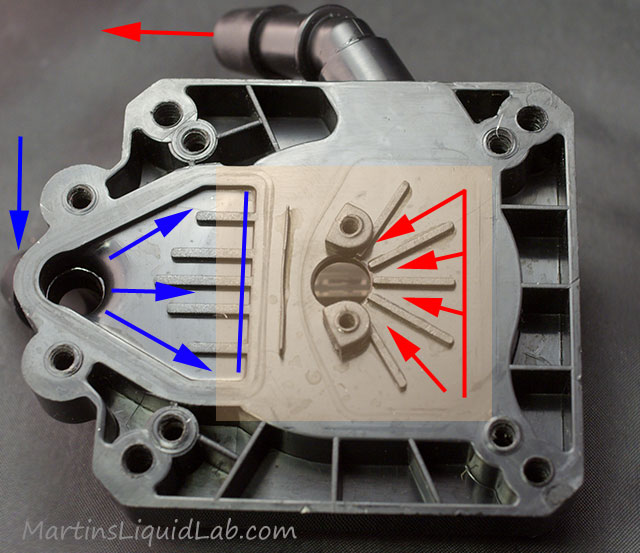
This is the top side of the pump volute or bottom of the flow chamber. Water comes in at the barb on the left, gets spread out and then enters the block base. It then travels across the block base through the diamond pins and then exit at the right and channels this sheet flow back to a conduit before entering the pump volute inlet at the center.
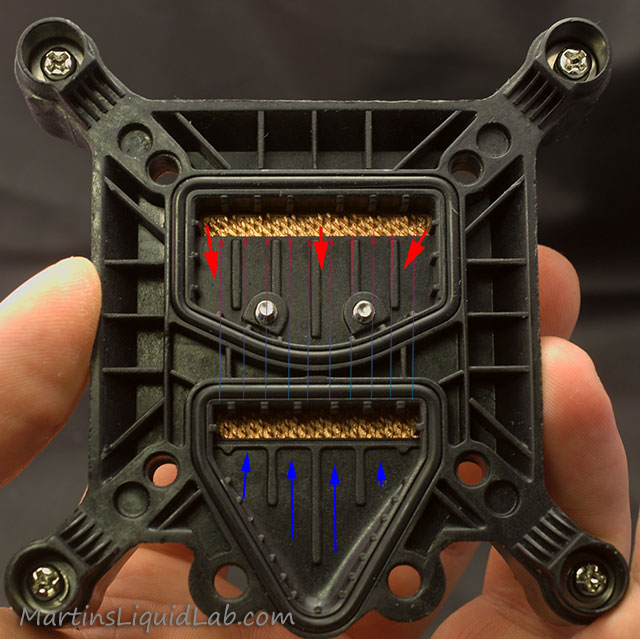
This is the other side of the flow chamber on top of the block base to give you a better understanding of how the water flows here. In the bottom, pushed down into the diamond pins, across the pins, and back out and recollected at the top. This is actually a really neat design and splits the water out into a nice sheet flow to utilized the pins in the entire base. The only thing I don't like is the rather cheap plastic feel to the injection casting, particularly the coarse screws, although I didn't have any problems with the sample.
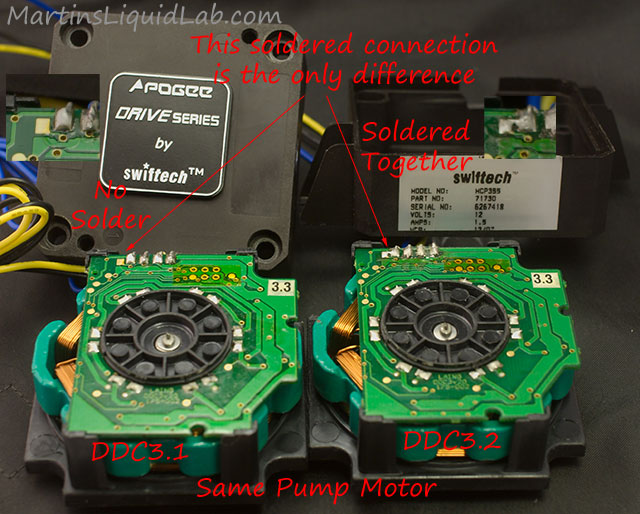
And the exciting part, the Apogee Drive 350 is the same pump motor as the Swiftech MCP350 which is also the same thing as the Laing DDC3.1. It's the 10watt motor, but in reality it's also the same thing as the 18watt MCP355 or Laing DDC3.2 except it's missing one soldered connection. The great thing about this is you can easily take the motor out of this unit and install and aftermarket pump top of your liking. The only thing different about it is you will have a pump casing that doesn't have mounting feet and the bottom will have the Apogee Drive emblem. In addition it's very easy to convert this to the 18 watt pump motor by simply soldering across the above contact point. Note this will void your warranty so do so at your own risk, but it works fine and they are truly the same motor with the current Laing pumps today that have the blue impeller.
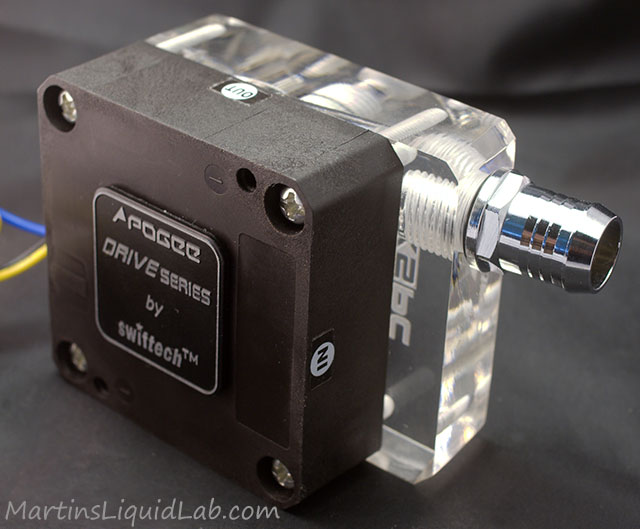
This is what you get when you pull the motor and add an XSPC top to it, a very high quality, upgradeable (18watt), and powerful separated pump.
This is what I like so much about this. Many folks come to the forums with very low budgets and want to get into water cooling. This is a great way to start and have the ability to upgrade to more later. Then you've basically combined the pump and water block into one item and saved a great deal of startup cost. More importantly this is an awesome and powerful pump motor and can be modified into an 18 watt motor very easily.
Kudos to Swiftech for giving you an exemplary complete package with everything you need, including an AMD kit!!
The base is not quite a mirror finish, but it is good and very slightly bowed around the center of the base.
Here is a look at the bowing of the base; there is a very slight bow to the center.
Here is a photo of the base removed; it is attached with four coarse threaded screws into the pump top. One interesting observation is how the flow is spread over two large slots. This is even a greater effort to spread the flow evenly over the entire base. This was easy enough to do, although the coarse screws don't provide the same machined quality as a fine screw with a tapped hole. Also note that the base has one corner of the pins removed, this ensures that the base can only be installed one way, so it's not possible to get it installed incorrectly. Above that is the pump top flow spreading chambers which are held to the pump motor via four large screws and two interior smaller screws. The actual pump motor can removed by four larger allen bolts on the other side of the pump.
Removing the motor you are left with these components, Pump Volute and Flow Chamber still connected here.
I did run into one QC issue, the pump volute exit has a bigger than expected casting flaw. This is just where part of the injection mold fits together and there was apparently a larger than normal gap present when this top was fabrication. So I took out my hand dremel and shaved off this lip approximately as outlined in yellow above. Having only one of these, I'm not sure if this is typical, but one forum member noted he didn't see anything this bad on his sample so this might just be the exception. The pump would still work fine without doing anything, but I have full blown tinkeritus and can't help myself..:)
This is the top side of the pump volute or bottom of the flow chamber. Water comes in at the barb on the left, gets spread out and then enters the block base. It then travels across the block base through the diamond pins and then exit at the right and channels this sheet flow back to a conduit before entering the pump volute inlet at the center.
This is the other side of the flow chamber on top of the block base to give you a better understanding of how the water flows here. In the bottom, pushed down into the diamond pins, across the pins, and back out and recollected at the top. This is actually a really neat design and splits the water out into a nice sheet flow to utilized the pins in the entire base. The only thing I don't like is the rather cheap plastic feel to the injection casting, particularly the coarse screws, although I didn't have any problems with the sample.
And the exciting part, the Apogee Drive 350 is the same pump motor as the Swiftech MCP350 which is also the same thing as the Laing DDC3.1. It's the 10watt motor, but in reality it's also the same thing as the 18watt MCP355 or Laing DDC3.2 except it's missing one soldered connection. The great thing about this is you can easily take the motor out of this unit and install and aftermarket pump top of your liking. The only thing different about it is you will have a pump casing that doesn't have mounting feet and the bottom will have the Apogee Drive emblem. In addition it's very easy to convert this to the 18 watt pump motor by simply soldering across the above contact point. Note this will void your warranty so do so at your own risk, but it works fine and they are truly the same motor with the current Laing pumps today that have the blue impeller.
This is what you get when you pull the motor and add an XSPC top to it, a very high quality, upgradeable (18watt), and powerful separated pump.
This is what I like so much about this. Many folks come to the forums with very low budgets and want to get into water cooling. This is a great way to start and have the ability to upgrade to more later. Then you've basically combined the pump and water block into one item and saved a great deal of startup cost. More importantly this is an awesome and powerful pump motor and can be modified into an 18 watt motor very easily.
Low Cost and Upgradable Water cooling Startup Scenario
Perusing the NCIX water cooling section I find the following:Apogee Drive Unit = $82
Swiftech MCR320 = $51
Tubing and fittings = $20
Want to start off even cheaper? Buy a heater core at your local automotive store for $20 and solder on some barbs.
So the total would come to around $150, and you have a nice large triple radiator and quality pump/block combo with plenty of potential for future expansion. Heck for even $120 you could build a nice system with a heater core if you have soldering skills. Later you might decide on a different water block for a few more degrees performance, no problem, buy a good pump top and turn your drive into a stand alone pump. Need more pumping power?...no problem...solder the two contacts above and turn the motor into an 18watt pump. So in the end this pump/block gives you a great foundation to build from, that's very different from any other pump/block combo I've seen out there. Typically other options have weak pumps and poor blocks that are usually discarded when users want to upgrade.
Pump Performance Testing
This is kind of an odd block considering it's a pump too, so with that I figured I'd do my normal pump testing. This utilizes my King Instruments Flow rate meter to monitor flow rate, then I used my Dwyer Digital manometer to measure the pressure difference between outlet and inlet side of the pump. In addition, to control flow rate and change restriction, I have a 3/4" brass globe valve at the outlet and use this to control the flow rate to set increments that I record in my template sheet.
Overall the curves follow pretty closely to a stock DDC 3.1 curve, but with the added block restriction. In the end the as tested flow rate returned approximately 1.4GPM, which is good for a 10watt motor. No complaints here, this is plenty of pumping power for a radiator, and could easily handle a few more blocks in there.
Thermal Test Specifications (for us testing geeks)
These are my standard quad core processor testing specs, everything here was much the same except I pulled out the DDC3.2 pump, I added an XSPC bay reservoir, and used the pumping power provided by the Apogee Drive 350. For thermal testing I decided to try and follow a 5 mount method of logging temperatures. Here are some of the specifics in my testing method: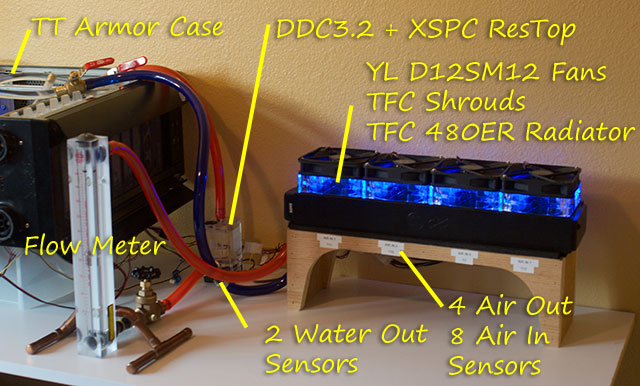
- Real World Full System Testing - Over time I developed a radiator testing bench that I've decided to incorporate into my CPU block testing setup. This gives me a full 8 air inlet sensors, 4 air outlet sensors, and two water sensors to much more precisely monitor everything. My testing occurs as close to the real world as possible, I just have a crap load of sensors on everything. I am testing on a processor, with a loading program, in a real world computer case, with a fixed pump, and a regular radiator setup. All of this helps include the little odd things that actually occur in a regular system.
- Intel Core 2 Quad Q6600 Kentsfield Processor - Over clocked to 3600 MHz, 65nm, Vcore = 1.472 under load. Motherboard is a DFI Lanparty X48 LT with 4GB of Corsair Dominator memory with fan module. The north bridge and south bridge chips are both water cooled. Video card is an EVGA 8800GTX, also watercooled. Video card and chipset on a separate loop running a D5 pump with EK pump top and HWlabs 480GTX radiator. Case is a Thermaltake Armor, position is horizontal for easy block mounting case cover left off.
- 5 separate TIM applications and mounts averaged - This is not common, but extremely important. It's not uncommon at all to see mounting variations as high as 2 degrees or more, so with only one mount, that error can be as much as 2 degrees. When you mount 5 times and average those results, your standard deviation is significantly lowered and the overall testing confidence improved. In addition multiple mounts serve as a means to validate data, because each test is carried out again and again, chances are if some variable is wrong affecting results, it will show.
- Logging temperatures - After several iterations of a new testing methods I finally landed on logging of temperatures for 1 hour. I then can simply start up the loading routine, trigger on my two logging programs and A/C unit and walk away for an hour. I then come back and remove the first 10 minutes for warm-up time. The remaining 50minutes is then left to average out temperatures which are recorded every second over 18 active sensors plus 4 core temperatures. Logging is essential for higher resolution measurements. Our DTS core sensors are only resolved to 1C, however after logging that resolution out for 50 minutes of testing, that can be reduced significantly. In addition my ambient temperatures are held constant by an A/C system thermostat that actually makes the temperature swig up and down in a saw-tooth like fashion over a 2C difference. Logging this saw-tooth occurrence over a long period of time also levels out the ambient to a nicely resolved level of accuracy. While it's still not by any means an environmental chamber, I have been able to keep ambients fairly consistently around 21.7C
- Temperature Probes Deployed - I kept my sensors fairly basic, but I did run a few extra's just for interesting information. This includes a sensor for:
-
- 2 ea Water Out sensors (After radiator and before CPU block) Dallas DS18B20 Digital one-wire sensors, and CrystalFontz CFA-633
- 8 ea Air In Bottom (Bottom inlet side of radiator) Dallas DS18B20 Digital one-wire sensors, and CrystalFontz CFA-633
- 4 ea Air Out Top (Top out side of radiator) Dallas DS18B20 Digital one-wire sensors, and CrystalFontz CFA-633
- 4 ea Q6600 DTS sensor these were logged using Core Temp Beta Version 0.94. I chose this particular version because it stacks logged data cores in separate column which makes integrating into my crystalfontz data much easier.
- Crystal Fontz logging is accomplished through the use of their Cyrstalfonts 633 WinTest b1.9. Only special settings are turning off all packet debugger check boxes to avoid paging the processor.
- The Dallas DS18B20 Digital one-wire sensors that were used as noted above have a specified absolute accuracy of .5C with a .2C accuracy between 20 -30C temperature range. They also have resolution down to .0625C which is very good, and because they are digital they are not affected by the wiring or length of wire like thermocouples are.
- The CrystalFontz CFA-633 is an LCD with up to 32 channels of monitoring and logging capability. It logs temperatures of each channel on a one second interval, so over a 30 minute test, I'll have about 1,800 entries noting time and temperature of each channel. These are then averaged for a fairly accurate number.
- Pump - Laing DDC3.2 with XSPC Reservoir top. I think this pump represents the pumping power available to many users and gives a fair amount of strong pumping power. This top rated near the top in my pump top testing and is very powerful.
- Radiator - The Feser Company (TFC) 480 ER radiator with Yate loon D12SL12 medium speed fans at 12V with TFC shrouds in pull condition. This is an extremely powerful radiator and was purposely chosen because the smaller water/ambient deltas reach equilibrium fast and pressure drop for this radiator is minimal. This provided me very short warm-up periods and ensured maximum pumping power for the CPU blocks being tested. Yeah I know it's overkill for a CPU only loop, but I like it that way..:)
- TIM Material - While I really like the TIM consultants TC Grease 0098, I found the thicker consistency wasn't helping with mounting consistency and required user effort to seat the block down. For that reason I chose Artic Cooling MX-2, it's been very popular in the forums and preliminary testing showed it to perform well, it's noted as non-curing, and more importantly is a thickness/consistency that more accurately represents most thermal compounds and easily applied and removed. I felt this was important to maintaining a higher level of repeatability. There was no cure time allowed for the compound ( it's noted as a non curing compound). Testing was started immediately following block installation. TIM installation method is a heavy thin line method. I shoot to achieve nearly full IHS coverage in my application.
- Hardware - I've change my review process to include testing of two options. First an "As shipped" option that includes what you get in the box with the block, nothing more. This forces me to make due and use the hardware included and provides users some evaluation and performance of what you get straight from the box. In addition I plan to use a fixed hardware scenario to more closely look at the block only.
- Prime 95 Load - I used Prime 97, torture test, Custom, Min FTT 8K, Max FTT 8K, Run FFTs in place checked ON. This is an easy to use and consistently loading program. It provided the most consistent loading I could find for quad cores. I also experimented with OCCT 2.0.0a which worked fairly well, but the plotting routing caused some processor paging spikes that prime 95 did not show. There is also heavier loading programs such as Linpak, but prime 95 is a strong enough load to meet or exceed most real world applications, so I feel it is a good fit.
- Lapped IHS - My Q6600 has been lapped flat down to 1200 grit to ensure a true and flat surface. The stock Intel IHS can be very irregular, some are convex, some are concave, some are wavy, and some are fairly flat. Lapping a processor voids it's warranty, but it ensures a nice flat surface for optimal heat transfer. My particular processor has been lapped. A complete stock IHS may benefit more from a bowed block than my samples because it is flat.
- Fixed Ambient Temperature - My recent roundup of block testing brought forth that regardless of measuring water temperature you will in fact still incur testing error of the processor core temperatures if you allow ambient temperatures to fluctuate. I found on the order of .2 t .3C error for every degree in ambient difference, although it was too variable to pin down and appropriately correct for. In the end I decided on buying a window A/C unit that holds all testing to the same temperature. Ambient do go up and down as the thermostat kicks on and off, but the overall average temperature over a long logged test has been holding to less than .5C which is very good. I am running a Hair 8,000 BTU thermostatically controlled A/C unit in "Cool fan on at all times" to keep temperatures right at 22C.
Thermal Testing As-Shipped
First up is my review of the block tested as shipped straight out of the box with nothing more than installation of the block as most users would make use of it. The only thing modified is cleaning up of that casting flaw in the pump volute. First I'm including the summary table of the raw data collected...
Overall testing conditions were held fairly constant thanks to my window A/C unit and logging the results. Ambient were held on average to 21.8C, water to core deltas were held to 2.3C thanks to the mighty TFC480 radiator, and the average high to low core delta was about 4.5 degree C. One interesting note is that using this 10watt motor as opposed to my DDC3.2 produced water temperatures about .2C lower from the lower pump heat dump
Now to have a look at those results graphically over the range of mounts that I ran, you can see those results here:
Mounting consistency produced results that were within about a .2C standard deviation, and the hottest core ran about 50.6C on average.
Thermal Test Round 1 Compared to the Apogee GT and GTZ
It's always interesting to me to see various blocks of the same manufacturer compared, especially considering the Apogee Drive 350 is derived from the Apogee GT, I wanted to see how those two compared.
First the average of 4 cores, if anything the Drive 350 has a slight edge on the regular GT block, but considering testing errors present they are the same.
The highest core looks very similar, there is really no measureable difference between the Drive unit vs. a DDC3.2 with top and Apogee GT.
Note that the other tests were done with a DDC3.2 and XSPC Reservoir top.
Pros
- Excellent lost cost way to start water cooling.
- An exemplary accessory package, this ensures that a wide range of users have everything they need to install the block into their systems.
- Upgradeable High Quality Pump Motor, the pump can be modified to 18watts, and can be later removed and used as a stand alone pump with top.
- Back-plate is and all accessories needed are INCLUDED!!! VERY NICE!!
- Diamond pin matrix is capable of being cleaned by razor blade if needed
- Bowing O-ring provides good core contact.
- Does a find job cooling a Q6600 @ 3.6Ghz
Cons
- Back plate system requires motherboard removal for installation
- Plastic cast top and barbs could be broken if abused, no padding in packaging.
- Thermal performance while plenty adequate is not up to high end block performances such as the Apogee GTZ
- Casting doesn't have tapped screw holes, small flaw found in volute.
Bottom Line
I can't help but praise this product, while it's not an Apogee GTZ performance level, it does amazingly well for the cost and performed equally to that an Apogee GT setup with a strong pump. And what's even more important to me is the fact that it's built from quality parts (Apogee GT base and MCP350 pump) and upgradable with some modifications. This is an ideal product to start water cooling with, This allows users to start off with a high quality pump that can later be used as an independent pump, all it takes is the purchase of your favorite pump top. Combine this with a low cost triple radiator and decent fans and you'll be within a few degrees of about the best temps you can practically get with water cooling.Where to buy